
If your child struggles with focus, anxiety, or sensory overload, a vibrating pillow can transform their daily routine. This simple device delivers gentle, soothing vibrations that help regulate the nervous system, making it ideal for individuals with autism, ADHD, or sensory processing differences. While commercial versions cost $30 to $75, you can build a custom vibrating pillow for under $25 using basic sewing and electronics skills. In this guide, you will learn exactly how to make a vibrating pillow from scratch, including switch options, safe wiring techniques, and washable design tips that ensure durability and user safety.
Choose Your Design and Shape
The first step in making a vibrating pillow involves selecting the right size and style for your intended user. Consider where the pillow will be used most often, as this determines the optimal dimensions.
Pick a Size and Style
Common choices for vibrating pillows include:
- 12″ × 12″ square, ideal for hugging or sitting
- 14″ × 9.5″ rectangle, fits easily on chairs or laps
- Heart, animal, or themed shapes, perfect for children or personalized gifts
Create your pattern by drawing the final shape on cardboard, then add a 5/8-inch seam allowance around all edges. Cut two identical fabric pieces from your chosen materials.
Select Soft, Durable Fabric
Choose materials that feel comfortable against skin while standing up to regular use:
- Front side: Faux fur, fleece, corduroy, or printed cotton for visual appeal
- Back side: Solid cotton or breathable fabric for stability
- Optional lining: A protective inner layer shields electronics from stuffing
Pro Tip: If using plush or furry fabric, cut from the backside to prevent fraying and maintain texture.
Gather Essential Materials
Before starting construction, collect all necessary supplies. Having everything ready prevents interruptions during the building process.
Build the Pillow Structure
Basic sewing supplies needed include:
- Two fabric pieces cut to your pattern
- Polyester fiberfill stuffing
- 4″ to 6″ Velcro strip or zipper for access opening
- Scissors, pins, and sewing machine or needle
- Fabric marker or chalk for tracing
Assemble the Electronics
The vibration mechanism relies on these key components:
- Vibration motor (3V to 6V ERM type, salvaged from old phones or purchased online)
- Battery holder (2×AA or 2×D, depending on size and runtime needs)
- Switch system: arcade button, toggle switch, or 1/8″ jack for external switches
- 22 to 24 gauge insulated wire
- Hot glue gun and electrical tape or heat shrink tubing
Safety Note: Never power the circuit during assembly. Always disconnect batteries when soldering.
Install the Activation Switch
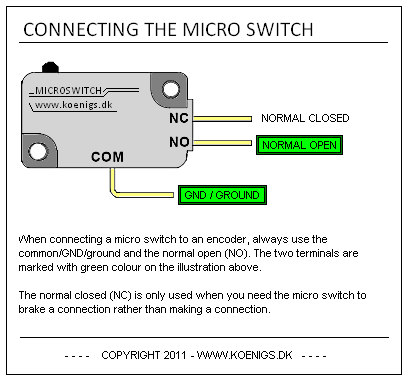
The switch determines how users activate the vibration. Choose between a built-in pushbutton or an external jack for switch-adapted use.
Mount a Pushbutton for Manual Use
For a simple press-and-vibrate design, follow these steps:
- Disassemble an arcade button into cap, nut, and microswitch components
- Mark the desired spot on the back of the front fabric piece
- Cut a hole slightly smaller than the button base for a snug fit
- Reinforce the area with iron-on interfacing cut 2″ larger than the hole
- Insert the button from the front and secure with the plastic nut from behind
This creates a sturdy, accessible switch ideal for users with limited motor skills.
Add a 1/8″ Jack for External Switches
For users who need adaptive equipment, install an external jack:
- Choose a side or back location for the jack
- Cut a small opening for the barrel
- Insert the jack and tighten the internal nut
- Solder two wires to the jack terminals (polarity does not matter for vibration motors)
Now any external switch with a 1/8″ mono plug can activate the pillow.
Prepare the Vibration Circuit

Wiring the electronics correctly ensures safe, reliable operation. Follow each step carefully to avoid mistakes.
Wire the Motor and Battery
- Solder one wire from the battery holder to one motor lead
- Extend the second motor lead with a 3″ to 4″ insulated wire
- Strip both ends of the extension and solder to the motor
- Insulate all connections with heat shrink tubing or electrical tape
ERM motors do not require specific polarity, so vibration works either way.
Test the Switch Connections
If using a three-lead microswitch:
- Insert batteries into the holder
- Press the switch to activate
- Touch the free wires to different lead pairs until the motor vibrates
- Mark the correct two leads for final wiring
Then solder the extended motor wire to one switch lead and the remaining battery wire to the other switch lead. Remove batteries and test again once fully connected.
Mount and Secure Electronics
Proper mounting prevents damage to components and ensures consistent vibration throughout the pillow.
Protect the Motor
Vibration motors can get caught in stuffing. Prevent this by covering the rotating mass with a cut plastic spoon top or milk jug piece. Ensure the shield allows full rotation without obstruction.
Combine and Glue Components
- Hot-glue the motor body to the back of the battery holder, avoiding moving parts
- This creates a compact, stable module that is easy to insert and remove
- Keep wires slack-free but not tight to reduce stress on connections
Place the unit centrally inside the pillow for balanced vibration distribution.
Sew and Close the Pillow
The enclosure must allow future access for battery changes and cleaning while providing a finished appearance.
Attach Closure for Access
Before sewing the main seam:
- Sew one side of Velcro or a zipper to the edge of the front fabric
- Sew the other side to the back fabric, aligning precisely
- Do not sew over the Velcro or zipper during final stitching
This allows future access for maintenance.
Complete the Enclosure
- Place front and back fabric pieces together with right sides facing
- Sew along the sew line, stopping at the closure ends
- Turn right-side out through the Velcro or zipper opening
- Ensure all corners are fully pulled out for a clean shape
Insert Components and Stuff
Loading the electronics and filling the pillow requires attention to placement and distribution.
Load the Vibration Module
- Place the motor-battery unit inside the pillow
- Position it centrally, away from high-compression zones unless designed for pressure activation
- Make sure wires are not pinched or stretched
Add Stuffing Evenly
- Use polyester fiberfill to surround the module
- Pack firmly enough to hold shape but allow the motor to vibrate freely
- Avoid overstuffing near the switch or jack to prevent pressure damage
Close the Velcro or zipper securely.
Test and Use Your Vibrating Pillow
Before handing the pillow to the user, perform thorough safety checks to ensure proper function.
Check Activation and Safety
Insert batteries and test:
- Press the button or plug in an external switch
- Confirm vibration starts immediately
- If no response, recheck solder joints and switch lead selection
Ensure there are no exposed wires and no overheating after five minutes of use. The switch should operate smoothly without sticking or resistance.
Choose the Right Operation Mode
Different modes suit different needs:
| Mode | How to Achieve |
|---|---|
| Momentary Vibration | Default with pushbutton or standard external switch |
| Continuous Vibration | Use a toggle switch or latching external switch |
| Timed Vibration | Connect a Jumbo SLT switch with auto-shutoff after 5 to 15 minutes |
| Pressure Activation | Add a tilt or compression sensor (advanced modification) |
Note: Unlike commercial Senseez pillows activated by squeezing, DIY versions typically require manual switch input unless modified with sensors.
Customize and Upgrade Your Design
Once you have mastered the basic build, consider these enhancements to improve functionality and user experience.
Add a Removable Cover
For easy cleaning:
- Make a second outer pillowcase with a zipper
- Insert the electronic core like a removable cushion
- Machine wash the cover safely without exposing electronics
Enhance Functionality
Popular upgrades include:
- Rechargeable 3.7V Li-ion battery: USB charging eliminates battery replacements
- Potentiometer or 3-way switch: Adjustable vibration intensity (low/med/high)
- Dual motors: Broader, more immersive vibration coverage
- Auto-shutoff timer circuit: Prevents overheating and saves power
Maintain and Clean Safely
Regular maintenance extends the life of your vibrating pillow and ensures safe continued use.
Replace Batteries and Inspect
Every few weeks:
- Open the Velcro or zipper
- Remove the module and replace AA or D cells
- Check for loose or frayed wires, damaged insulation, motor blockage, and fabric wear at seams
Clean Without Damaging Electronics
- With removable module: Machine wash the empty pillow cover without electronics
- Without removable module: Spot clean only with a damp cloth
- Never submerge electronics or expose them to water
Label the battery compartment clearly and include a seizure warning tag if used in therapeutic settings.
Compare DIY vs. Commercial Models

Understanding the differences helps you decide whether building yourself or purchasing makes more sense for your situation.
| Feature | DIY Vibrating Pillow | Commercial (e.g., Senseez) |
|---|---|---|
| Cost | $15–$25 | $30–$75 |
| Customization | Full control over fabric, shape, switch | Limited options |
| Activation | Button or external switch | Pressure-based (squeeze/sit) |
| Washability | Possible with removable module | Machine-washable (insert removed) |
| Build Effort | Moderate (sewing plus soldering) | None |
| Safety | Depends on builder | Factory-tested, BPA-free |
DIY saves money and allows complete personalization, while commercial units offer plug-and-play reliability.
Final Tips for Success
Follow these best practices to ensure your vibrating pillow works safely and effectively.
Follow Best Practices
- Use soft, hypoallergenic fabrics for comfort against skin
- Reinforce switch areas with interfacing to prevent tearing
- Insulate all wires and strain-relieve connections
- Place the motor centrally for even vibration distribution
- Add a warning label for seizure risks (do not use with vibration-sensitive epilepsy)
Know the Limitations
- Not for overnight or unsupervised use due to overheating risk
- Intended for short-term sensory regulation, not sleep
- Age suitability depends on cognitive ability, not chronological age
Expand Your Project
Once mastered, try creating vibrating hoodie inserts, multi-sensory pillows with sound modules, wireless control via Bluetooth switch, or classroom kits for special education settings.
Frequently Asked Questions About Making a Vibrating Pillow
How much does it cost to make a vibrating pillow?
Building a vibrating pillow costs approximately $15 to $25 for materials. This is significantly cheaper than commercial models, which range from $30 to $75.
What type of motor is best for a vibrating pillow?
A small DC motor with an eccentric rotating mass (ERM) rated for 3V to 6V works best. You can salvage these from old mobile phones or purchase them online for a few dollars.
Can I wash a vibrating pillow?
Yes, but only if you design it with a removable electronics module. Remove the battery and motor, then machine wash the fabric cover. Never submerge the electronic components.
How long do the batteries last?
Battery life varies based on motor load and usage patterns, but most AA or D batteries provide 5 to 20 hours of continuous vibration.
Is a vibrating pillow safe for children with seizures?
No. Vibrating pillows should never be used with individuals who have vibration-sensitive seizure disorders. Always include a warning label and supervise use.
Key Takeaways for Making Your Own Vibrating Pillow
Building a vibrating pillow combines basic sewing skills with simple electronics to create a powerful sensory tool. The project costs under $25, significantly less than commercial alternatives, while allowing complete customization of size, fabric, and switch type. Focus on safe wiring practices, proper insulation, and central motor placement for even vibration throughout the pillow. Include a removable cover or accessible opening for battery replacement and cleaning. With this guide, you can create a safe, soothing device that supports focus, calm, and sensory integration for anyone who needs it.