

You’ve seen those cozy floor loungers online—plush, inviting, and perfect for movie nights, reading sessions, or tummy time with your baby. But spending $50 or more at retail stores feels unnecessary when you can make your own pillow lounger in under an hour for less than $15. This guide walks you through four proven methods, from beginner-friendly fleece builds to durable cotton envelopes and safe baby loungers, so you can create the perfect floor seat for your family.
Whether you need a soft nest for your infant, a modular floor seat for toddlers, or extra guest seating for movie nights, there’s a DIY pillow lounger design that fits your skill level, timeline, and budget. We’ll cover fabric selection, key measurements, sewing techniques, and pro tips to ensure your creation stays intact even with active kids.
Choose Your Design: 4 Proven Methods

Not all pillow loungers are created equal. The best method depends on who it’s for, how often you’ll use it, and what tools you have available. Here’s how the four most effective builds compare at a glance.
Fleece Blanket Burrito: Fast and Beginner-Friendly
The fleece burrito method uses one twin blanket folded into a tube with internal seams that create pockets for pillows. This approach requires zero hemming since fleece doesn’t fray, making it perfect for first-time sewers.
This method takes just 30 to 45 minutes and costs under $14 total. The finished lounger is fully reversible and machine washable, handling kids’ movie nights and guest seating equally well.
Gather these materials before starting. You need one twin fleece blanket (66 by 90 inches), four queen-size pillows (20 by 28 inches), a sewing machine with matching thread, straight pins, and fabric scissors.
Follow these steps to build your lounger. First, pre-wash the blanket if desired to prevent later shrinkage. Lay the blanket right-side down on a flat surface. Fold one short end approximately 18 inches to create an overlap flap, then fold again so the total width becomes 27 inches (fleece width minus seam allowance). Sew both ends 4 to 5 inches from the raw edge, using backstitching at the start and end of each seam. Mark three interior lines every 19 inches along the fold, then sew straight lines across to form four pockets measuring 19 by 27 inches each. Turn the piece right-side out through the open end, and insert pillows one by one, pushing corners deep into each pocket.
Use a 12-inch overlap on the back flap to prevent pillows from slipping out during use.
Cotton Fabric Tube: Durable and Adjustable
The cotton envelope method creates a stronger, longer-lasting cover with hemmed edges and reclining straps. This version works best for families with active toddlers or anyone planning frequent long-term use.
This build lasts one to three years with regular use and lets you add straps for adjustable recline. You can choose custom prints and colors while maintaining full machine washability (just remove the pillows first).
Cut your fabric according to this plan. The front panel measures 28 by 82.5 inches (one needed). Both back panels measure 19 by 82.5 inches each. Cut four strap pieces at 8 by 3 inches. Note that standard 45-inch-wide fabric requires two separate lengths since 28 plus 19 plus 19 equals 66 inches, which exceeds standard width.
Sew the build in stages. Cut all panels first, then hem every edge with a half-inch double-fold hem. Sew the back panels together along the long edge if needed. With right sides together, sew the front panel to both back panels along the 82.5-inch sides, pressing seams flat afterward. Mark pocket lines 16.25 inches from the top and bottom. Create straps by folding each 8-by-3-inch strip lengthwise, folding edges in, and topstitching both sides. Attach straps 8.25 inches from the top edge on both sides using square plus X pattern stitching for reinforcement. Finally, insert pillows through the open end and close with a 12-inch overlap.
Reinforce strap stitching with a square plus X pattern to prevent tearing under stress.
Pillowcase Chain: 5-Minute No-Cut Version
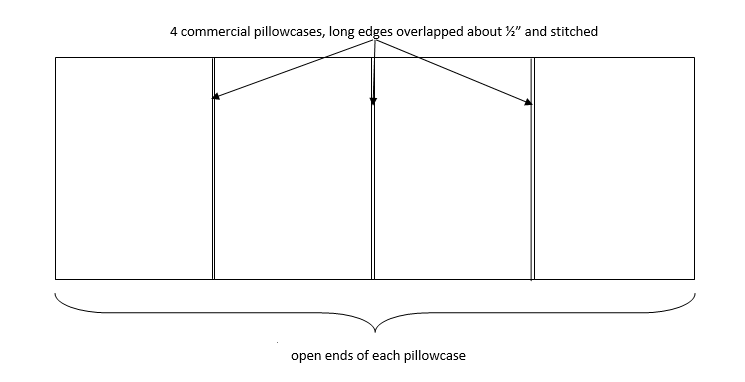
The pillowcase chain offers the fastest route to a floor lounger. No measuring, no cutting, no hemming. This method simply chains four to five pillowcases together and inserts pillows, creating a temporary setup in minutes.
This approach takes only 5 to 15 minutes and uses pillowcases you already own, making it essentially free. It’s ideal for instant loungers, toddler use, or zero-cost builds.
Start by laying two pillowcases flat with right sides together. Align the open ends and pin one long edge in place. Sew along that edge with a straight stitch, backstitching at both ends. Repeat the process to attach additional cases in a chain. Insert pillows tag-end first into the chain. For a permanent finish, fold and stitch the open ends closed.
Flannel or reinforced pillowcases extend durability since standard cases may tear with heavy use. This method works best for short-term or temporary setups rather than daily use.
U-Shaped Baby Lounger: Safe Tummy Time Nest
The U-shaped baby lounger replicates premium products like Boppy or DockATot for under $10. It cradles your infant’s head and torso in a supportive U-shape, perfect for supervised tummy time or lounging.
This design supports tummy time development while offering washable, customizable firmness. Use only for awake, supervised sessions—this is not a sleep surface.
Gather one standard pillow (20 by 26 inches), one to two cotton pillowcases, a needle with thread, scissors, a ruler, and an iron.
Begin with the pillowcase turned inside out and ironed flat. Measure 6.5 inches from each corner and draw a 6.5-inch arc connecting those points. Sew along both arcs with a half-inch seam allowance (sew slightly inside the line on the bottom for easier closure). Trim excess fabric, turn right-side out, and push out the corners. Mark side channels by measuring 6 inches inward from each edge and drawing three parallel lines (the center line extends 3 inches beyond the others). Sew along all three lines to create the U-shaped channel. Remove filling from a second pillow and stuff it into the channel from one end, hand-stitching the opening closed with a ladder or backstitch. Slip the second pillowcase over the entire piece for a removable, washable cover.
Never leave your baby unattended in this lounger. Add waterproof lining inside the channel for easy cleanups against drool or spills.
Pick the Right Fabric: What Works Best
Your fabric choice directly impacts durability, comfort, and how easily the lounger sews together. Matching the material to your goals prevents wasted money and frustrating construction problems.
Fleece stands as the easiest choice for beginners. It requires no hemming, feels soft, and washes beautifully. The downside involves less durability and potential pilling over time. This material works best for quick loungers and kids’ use.
Cotton delivers custom looks with strong durability and long-lasting performance. It does require hemming and may shrink if not pre-washed. Choose cotton for long-term projects and custom designs.
Canvas provides the most rugged option with a professional look and serious durability. It’s stiff when new and needs pre-washing before use. Canvas suits active households and frequent daily use.
Flannel offers cozy warmth and soft texture but shrinks easily and wears faster than other options. This works well for seasonal or indoor-only use.
Pillowcases provide a zero-cut shortcut with instant construction. The thin material lacks durability, making this best for temporary setups only.
Buy extra yardage when using patterned fabric to ensure prints match across seams.
Key Measurements: Get the Sizing Right
One sizing mistake makes your lounger either too tight to insert pillows or too loose, causing constant slipping. These measurements keep construction on track.
Standard pillows measure 20 by 26 inches. Queen pillows measure 20 by 28 to 30 inches. Use queen pillows for adult loungers since they fit better in 27-inch pockets.
Pocket width should measure 20 to 27 inches to accommodate pillows plus one inch for seam allowance. Pocket height ranges from 19 to 28 inches depending on your folding method. Always use half-inch seam allowance per side.
Four pillows create approximately 80 inches of length. Five pillows reach about 90 inches. Adjust your fabric length accordingly.
The overlap closure needs at least 6 inches minimum, but 10 to 12 inches works best for full coverage. This prevents pillows from falling out during use. When closed, the back flap should fully cover the open end with no gaps visible.
Sewing Tips for a Strong, Lasting Lounger
Even beginners achieve professional durability with the right techniques. These methods ensure your lounger survives active kids and regular washing.
Use straight stitches for all main seams and always backstitch at the start and end of every seam to prevent unraveling. Double or triple stitch high-stress areas like straps and corners where pillows push against fabric.
Fleece requires no seam finishing since it doesn’t fray. Cotton and canvas benefit from zigzag stitching or serged edges to prevent fraying over time.
For hems, fold 1 inch, press, fold another half inch, then stitch. This creates a clean half-inch double-fold hem. Iron before and after sewing for crisp, accurate lines.
Use a disappearing-ink marker for pocket placement lines. Pin or clip fabric layers together before sewing to prevent shifting. A quilting ruler ensures straight cuts and accurate measurements.
Test your stitch length on scrap fabric first. Adjust settings for thick fleece or stretchy materials before committing to the main project.
Add Functional Upgrades
Simple enhancements transform a basic lounger into a more useful piece. These additions address common needs like adjustability, floor grip, and easy cleaning.
Reclining straps let toddlers lean back comfortably. Cut 8-by-3-inch strips and attach them 8.25 inches from the top edge on both sides. This creates a adjustable support angle for reading or relaxing.
Non-slip backing prevents sliding on hardwood or tile floors. Iron-on rubberized fabric cuts to fit the bottom panel before assembly. This upgrade matters most in households with smooth flooring.
Waterproof lining protects baby loungers against drool and spills. Add PUL fabric or laminated cotton inside the channel for easy wipe-clean maintenance.
Personalization makes loungers special. Embroider names or apply fun fabric shapes like animals or stars. This works wonderfully for gifts or children’s rooms.
Who Should Use Which Design
Matching the lounger to your specific situation prevents wasted effort and money. Here’s how different users benefit from each method.
Parents with toddlers benefit most from the cotton envelope with straps. The durable construction handles daily play and reading, washes easily, and supports active kids through years of use.
Infants need the U-shaped baby lounger for safe, supportive tummy time. This design replicates $50-plus commercial products at a fraction of the cost, but requires constant adult supervision.
Movie night enthusiasts love the fleece burrito. The soft feel and colorful options create instant comfort, and the entire piece stores flat between uses.
College students and apartment dwellers benefit from the pillowcase chain or fleece method. Low cost and space-saving design work well in small living areas.
Frequent floor readers should choose canvas or flannel. The comfortable feel lasts through years of daily use, and custom prints add personal style to any room.
Care and Maintenance Tips
Proper care extends your lounger’s life significantly. These practices keep it clean, functional, and comfortable for years.
Always remove pillows before washing the cover. Machine wash cold with tumble dry low for fleece, cotton, and canvas materials. Use gentle cycle and avoid high heat for flannel or jersey fabrics.
Spot cleaning works best for baby loungers. Use a damp cloth with mild soap for small messes, then air dry completely before reuse.
Store the lounger folded flat or rolled in a closet or under the bed. Keep it away from damp areas to prevent mold or mildew.
Boost durability by double-stitching high-stress areas, using quality thread (polyester or cotton-wrapped polyester), and repairing small tears immediately before they worsen.
Cost Comparison: DIY vs. Retail

Building your own saves significant money while offering customization impossible with store-bought options. Here’s how costs break down.
| Method | Cost | Skill Level | Time Required |
|---|---|---|---|
| Fleece Burrito | $7–14 | Beginner | 30–45 minutes |
| Cotton Method | $20–30 | Intermediate | 2–3 hours |
| Pillowcase Chain | $0–10 | Beginner | 5–15 minutes |
| Baby Lounger | Under $10 | Beginner | 45–60 minutes |
| Retail Lounger Cover | $27–80 | N/A | N/A |
DIY methods save 60 to 90 percent compared to retail prices while delivering full customization in size, fabric, and features.
Final Tips for Success
These pointers help you avoid common mistakes and create a lounger that performs beautifully.
Start with the fleece method if you’re new to sewing. The forgiving material and simple construction build confidence before tackling more complex projects.
Use queen pillows for better fit and comfort. The slightly larger size fills pockets more completely than standard pillows.
Make the overlap at least 10 inches. This simple choice prevents pillows from slipping out during use, especially important with active kids.
Double-stitch straps and stress points. These areas take the most force and benefit from reinforced stitching.
Never leave infants unattended in any lounger. These are not sleep surfaces—use only for supervised awake time.
Add non-slip backing if your floors are hardwood or tile. This prevents the lounger from sliding across the room during use.
Pre-wash fabric before cutting. This eliminates shrinkage surprises after your first wash.
Frequently Asked Questions About Making a Pillow Lounger
How long does it take to make a pillow lounger?
The fastest method (pillowcase chain) takes just 5 to 15 minutes. The fleece burrito method requires 30 to 45 minutes. The cotton envelope method takes 2 to 3 hours. The baby lounger build needs 45 to 60 minutes.
What pillows work best for a DIY pillow lounger?
Queen-size pillows (20 by 28 inches) fit best in most adult and toddler loungers. The slightly larger size fills pockets more completely than standard pillows. For baby loungers, use one standard pillow (20 by 26 inches) for the filling.
Can I make a pillow lounger without a sewing machine?
Yes, but the result will be less durable. Hand-stitching works for the baby lounger closure, but seams may loosen faster with heavy use. The pillowcase chain method requires minimal sewing and could work with hand stitching for temporary setups.
How do I keep pillows from falling out of my lounger?
Use an overlap of at least 10 to 12 inches on the back flap. This creates a secure closure that prevents pillows from shifting out during use. Make sure to push pillow corners deep into each pocket before closing.
Is a pillow lounger safe for babies?
Baby pillow loungers (U-shaped design) are safe only for supervised, awake time such as tummy time. Never leave an infant unattended. These products are not sleep surfaces and should not be used for napping or overnight sleep.
How do I clean my pillow lounger?
Remove all pillows first. Machine wash the cover in cold water with mild detergent, then tumble dry on low heat. For baby loungers, spot clean with damp cloth and mild soap rather than full immersion. Air dry completely before reinserting pillows.
Key Takeaways for Building Your Own Pillow Lounger
Making a pillow lounger delivers serious value. You save 60 to 90 percent compared to retail prices while gaining full customization in fabric, color, size, and features. Choose the fleece burrito method for quick, beginner-friendly builds. Choose the cotton envelope method for durability that lasts years. Choose the pillowcase chain for instant temporary seating. Choose the U-shaped baby lounger for safe infant support.
Start with your skill level and budget, gather materials, and begin sewing. Your perfect lounger is just a few seams away.