
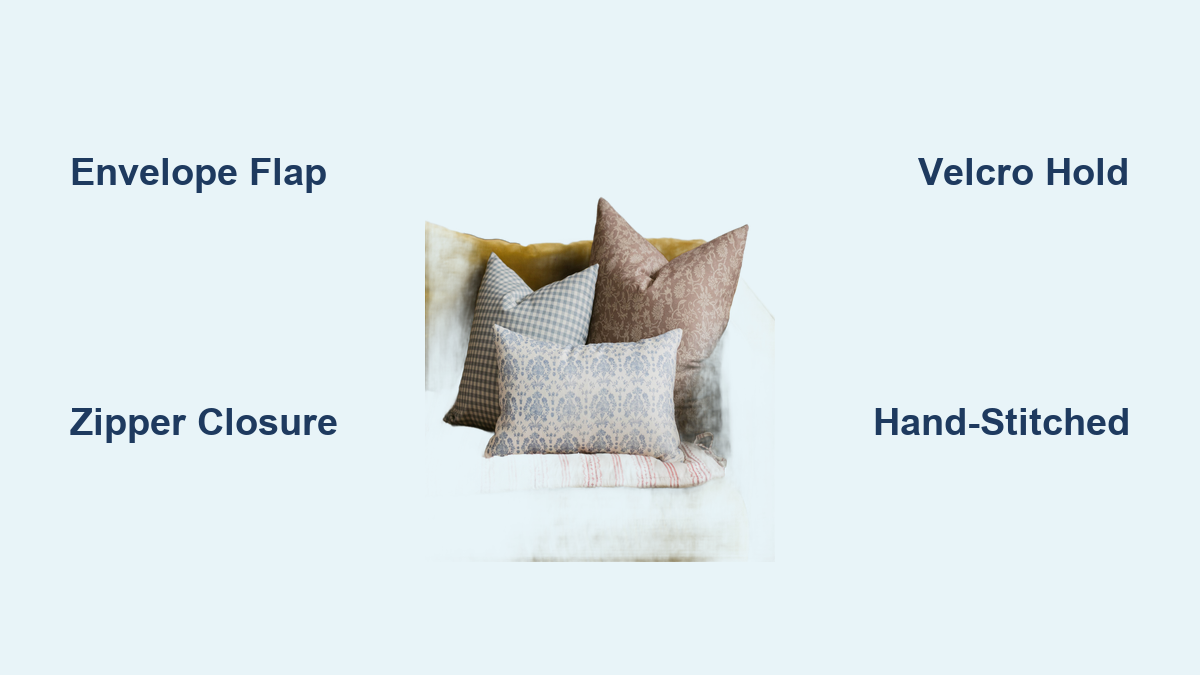
Tired of dull, mismatched couch pillows? You don’t need to buy expensive replacements. Learning how to make couch pillow covers takes under 30 minutes with basic sewing skills, and custom covers instantly refresh your living room while saving money. Whether you want to switch styles for seasons or simply update a rental, DIY pillow covers let you transform your space without replacing furniture.
This guide walks you through choosing fabric, measuring inserts, cutting patterns, and sewing five different closure types from easy envelope flaps to invisible hand-stitched finishes. By the end, you will know exactly how to make couch pillow covers that fit snugly, wash easily, and look professional.
Choose the Right Closure Type
Selecting the best closure method depends on your skill level, washing needs, and desired aesthetic. Each type offers unique benefits for different home environments.
Envelope Flap: Fast and Washable
The envelope closure is the top choice for beginners and busy households. It uses overlapping back panels to secure the pillow insert without zippers or Velcro. Simply slide the cushion in through the hidden opening. Because it is fully open at the back, you can remove the cover anytime for machine washing, which is ideal for homes with kids or pets.
Two versions exist. The single-piece method uses one long fabric folded, while the two-panel version uses separate overlapping flaps. Both use straight seams and take under 15 minutes to sew.
Zipper Closure: Secure and Sleek
Use a zipper for deep, thick, or three-dimensional couch cushions that need a tight, permanent fit. While more advanced, an invisible zipper creates a seamless finish that looks store-bought. This method requires a zipper foot on your sewing machine and careful alignment.
The zipper is best for formal living rooms where appearance matters. Once installed, it allows full removal for cleaning, unlike glued or hand-sewn options.
VELCRO Closure: Strong and Reusable
VELCRO-secured covers offer a durable, reusable option for high-traffic areas. The hook-and-loop tape provides a firm hold, keeping the insert from slipping out. It is easy to open and close for weekly washing.
A slight ridge is visible when closed, so avoid this method on ultra-modern decor. Attach the hook side to the wrong side and the loop side to the right side, then fold and sew the sides. This method takes about 10 minutes and is great for quick swaps.
Button or Tie Back: Decorative Charm
Add vintage flair with buttonholes or fabric ties on the back. This method is ideal for rustic, farmhouse, or boho styles. It requires hand-sewing or a buttonhole function on your machine.
This closure is not recommended for frequent washing due to wear on knots or stitches. Use contrasting buttons for a standout detail. It works best for accent pillows, not daily-use couch cushions.
Hidden Hand-Stitched Back: Seamless Finish
For a high-end, no-hardware look, close the back with an invisible ladder stitch. The cover appears fully enclosed with no visible closure. This is perfect for down-filled or tightly stuffed pillows you do not plan to wash often.
After sewing three sides and inserting the form, hand-sew the final opening closed using tiny, interlocking stitches. This takes 30 to 60 minutes but delivers luxury results.
Pick Durable, Washable Fabric
Your fabric choice affects durability, ease of sewing, and long-term care. Match the material to your home needs and your sewing experience.
Best Fabrics for Couch Pillows
Cotton and linen are top picks for most DIYers. Medium-weight cotton is easy to cut, sew, and machine wash, which makes it perfect for beginners. Linen offers elegant drape and breathability but wrinkles more easily.
For homes with pets or children, choose durable canvas, denim, or polyester blends that resist stains and wear. Velvet adds luxury but requires a ballpoint needle and careful handling. Faux leather gives a modern edge but should be spot-cleaned. Wool is cozy for winter but often requires dry cleaning.
Avoid Shrinkage With Pre-Washing
Always pre-wash fabric before cutting. Skipping this step risks shrinkage after sewing, leading to a too-tight or misshapen cover. Wash and dry your fabric the same way you will clean the finished pillow, which is especially important for cotton and linen.
Iron the fabric flat afterward to ensure accurate measurements. This small step prevents big regrets later.
Buy Enough Yardage Efficiently
One yard of 45-inch to 60-inch wide fabric typically makes two standard pillow covers, such as 18-inch by 18-inch or 22-inch by 22-inch sizes. To maximize efficiency, lay out both front and back pieces side by side before cutting.
For directional prints like stripes or florals, align the design so it faces the right way on every pillow. Use grid-lined wrapping paper to mock up the layout first. This saves fabric and avoids mistakes.
Measure Pillow Inserts Accurately
Never measure an old, sagging cover. Always use the actual pillow insert for precise sizing. A snug, plump fit comes from accurate dimensions.
Size for a Snug, Plump Fit
Cut your cover 1 inch smaller than the insert on each side. For example, use an 18-inch by 18-inch cover for an 18-inch by 18-inch insert. This slight tension creates a full, professional look.
If the cover is too big, the pillow will look flat and sloppy. If too small, it will stretch and strain seams. Use a soft measuring tape and press it gently against the insert without compressing it.
Standard Couch Pillow Sizes
Common sizes include 16-inch by 16-inch for small accent or loveseat pillows, 18-inch by 18-inch as the most popular for standard sofas, 20-inch by 20-inch or 22-inch by 22-inch for oversized statement pillows, and 26-inch by 26-inch Euro shams for back support.
Write down each insert exact size before cutting. Label your notes to avoid mix-ups when making multiple covers.
Cut Fabric Using Closure-Specific Formulas
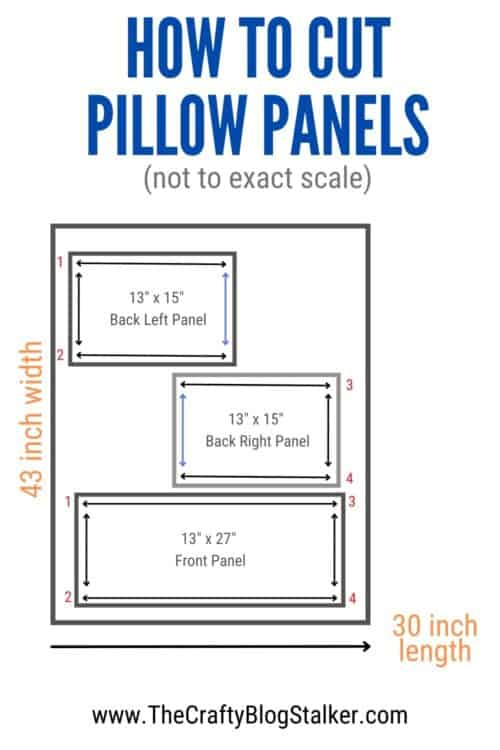
Each closure type requires different cutting dimensions. Use these proven formulas to get it right the first time.
Single-Piece Envelope: Simple Math
For a vertical envelope flap, cut one rectangle with width equal to the insert width and length equal to twice the insert height plus 8 inches. For example, for a 12-inch by 12-inch insert, cut 12 inches by 32 inches. The extra 8 inches allows both ends to overlap in the middle, creating the envelope.
Two-Panel Back: Custom Overlap
Cut three pieces for this method. The front panel should be the same size or 1 inch smaller than the insert. The large back panel uses width by half the height plus 3 to 4 inches. The small back panel uses width by half the height plus 1 to 2 inches.
For a 26-inch by 26-inch Euro sham, cut back panels 26 inches by 20 inches and 26 inches by 16 inches. The 4-inch overlap ensures full coverage.
VELCRO Cover: Minimal Seam Allowance
Cut fabric with width equal to insert width plus 1 inch and length equal to twice the insert height plus 3 inches. For example, for a 12-inch by 12-inch insert, cut 13 inches by 27 inches. The extra length accommodates the VELCRO strip and seam allowance.
Zipper Version: Account for Depth
For deep couch cushions, cut top and bottom panels at length plus 1 inch by width plus 1 inch. Cut the side strip using the perimeter multiplied by depth plus seam allowance. Add one-half-inch seam allowance to all sides. Use an invisible zipper cut to match one side length.
Sew the Envelope-Style Cover
The single-piece envelope is the fastest method, ideal for your first DIY pillow cover. No special tools are needed beyond basic sewing supplies.
Hem the Short Edges First
Lay the cut fabric right side down. Fold one short edge one-half-inch toward the wrong side, press with an iron, then fold another one-half-inch to encase the raw edge. Topstitch along the inner fold to create a clean double hem. Repeat on the opposite short edge. This prevents fraying and gives a polished look.
Fold and Pin for Overlap
Place the fabric right side up. Fold one end up toward the center, then fold the other end down over it. Adjust so the total width matches your pillow insert. The hemmed edges should face outward. Pin the side seams to hold the layers together before sewing.
Stitch With One-Half-Inch Seam Allowance
Using a straight stitch, sew down both sides with a one-half-inch seam allowance. Backstitch at the start and end to lock the thread. Trim the corners diagonally to reduce bulk when turning. Use a point turner or chopstick to push out the corners gently. Flip the cover right side out and press with an iron for crisp edges.
Insert Pillow and Fluff
Slide the insert through the envelope opening. Tap or karate chop the corners to settle the filling. Adjust the cover so seams align and the fabric lies smooth. This method is done in 15 minutes or less.
Assemble Two-Panel Overlap Back
For larger pillows like Euro shams, two separate back flaps offer better coverage and a tailored look.
Cut and Hem Back Panels
Cut two rectangular back pieces with different heights. On the long edge of each, fold 1 inch toward the wrong side, then fold another one-half-inch, press, and topstitch. This creates a deep hem that will not gape.
Layer and Pin for Assembly
Place the front panel right side up. Lay the back panels on top, right sides down, with hemmed edges facing up and overlapping in the center by 4 to 6 inches. Align all outer edges and pin around the perimeter. The longer flap goes on the bottom, with the shorter on top.
Sew and Finish All Four Sides
Sew around the entire square with a one-half-inch seam allowance. Backstitch at start and end. Trim the corners at 45 degrees to reduce bulk. Turn right side out through the overlapping back. Use a pencil or point turner to shape the corners. Press flat and insert the pillow.
Install VELCRO for Reusable Hold
When you need a strong, washable closure, VELCRO is a smart alternative to zippers.
Attach Hook and Loop Correctly
Cut VELCRO tape to the insert width. Pin the hook side, which has rough texture, to the wrong side of the fabric. Pin the loop side, which is soft, to the right side. Sew around all four edges to secure. This placement ensures the hook will not scratch furniture or skin.
Fold and Sew Sides Together
Bring the VELCRO-faced sides together, right sides in. Align the long edges and pin or clip. Sew both side seams with one-half-inch allowance. Trim corners, turn right side out, and press. The VELCRO will now fasten on the outside, keeping the insert secure.
Test for Smooth Closure
Press the hook and loop together firmly. It should hold tight but open easily. If it is too stiff, check for stitching that is blocking the tape. This method is ideal for pet beds or kids couches where covers get washed weekly.
Insert an Invisible Zipper
For a seamless, high-end finish, use an invisible zipper on deep or thick cushions.
Use a Zipper Foot
Attach the zipper foot to your machine. It lets the needle stitch close to the zipper teeth. Place the zipper face down along the basted center seam of your two main panels. Pin or clip in place.
Sew in Two Passes
Sew one side of the zipper to the first panel, then the other side to the second panel. Keep the fabric flat and the zipper coil aligned. After both sides are attached, open the zipper partially and sew the side seams, enclosing the zipper ends.
Finish With Clean Edges
Once sewn, the zipper should disappear into the seam. Turn the cover right side out and zip it closed. The result looks like a continuous, hardware-free pillow, perfect for modern decor.
Perfect Hemming and Seam Techniques
Clean hems and strong seams make your covers last longer and look professional.
Double Fold Hem: Neat and Durable
Fold the edge one-half-inch, press, then fold another one-half-inch to hide the raw edge. Topstitch from the right side. Use matching thread and backstitch at both ends. This method works for envelope flaps and back panels.
French Seam: No Raw Edges
For sheer or loosely woven fabrics, use a French seam. First, sew with wrong sides together and one-fourth-inch seam. Trim edges, then fold again so the first seam is enclosed and stitch with three-eighths-inch allowance. This totally hides fraying.
Backstitch Every Seam
Always backstitch at the beginning and end of each seam. This prevents unraveling from daily use. Do not skip it, even on short stitches.
Customize With Embellishments
Make your pillows stand out with simple upgrades that take minutes.
Add Pom-Poms or Tassels
Sew trim along the edges before assembling. Use contrasting colors for fun. This is great for kids rooms or boho styles.
Use Fabric Paint or Stencils
Stencil patterns onto drop cloth covers before sewing. Let dry completely. Washable fabric paint holds up to use.
Try Contrast Binding
Use piping or colored binding to frame the pillow. Insert it into the seam when sewing side panels. This adds depth and polish.
Wash and Maintain Pillow Covers
Longevity depends on proper care. Follow these tips to keep covers looking new.
Machine Wash Removable Types
Envelope, VELCRO, and zipper covers can go in the washer. Use cold water and mild detergent. Tumble dry low or air dry to prevent shrinkage.
Spot Clean Hand-Sewn Versions
Avoid submerging ladder-stitched covers. Blot spills with a damp cloth and mild soap. Let air dry completely before reinserting.
Rotate Seasonally
Keep two sets, such as flannel or velvet for winter and cotton or linen for summer. Swap them like you would clothes, refreshing your space affordably.
Troubleshoot Common Issues
Fix problems before they ruin your project.
Bunched or Puffy Corners
Trim corners at 45 degrees before turning. Do not cut too close to stitches. Use a point turner to gently push out sharp corners.
Gaping Back Flap
Ensure back panels overlap by at least 4 inches. For a 22-inch pillow, one flap should be 13 inches and the other 15 inches, creating 6 inches of overlap.
Visible Stitches on Hand Closure
Practice the ladder stitch on scrap fabric. Pull thread taut after every few stitches. The seam should disappear when done right.
Misaligned Seams
Pin every 2 to 3 inches and use a seam guide on your machine. Check alignment before starting to sew.
Key Takeaways for Making Couch Pillow Covers

Making couch pillow covers is a fast, affordable way to transform your living space. With the right measurements, pre-washed fabric, and a simple envelope or zipper closure, you can create custom, washable covers in under 30 minutes. Choose durable materials like medium-weight cotton or canvas, press every seam for a professional finish, and personalize with trim, paint, or contrast binding. Start with one pillow using the envelope method, which requires only straight seams and basic tools. Whether you are refreshing a rental or designing a luxury look, these DIY covers offer style, function, and pride in craftsmanship. Chances are, you will end up redoing the whole couch.
Frequently Asked Questions About Making Couch Pillow Covers
What is the easiest closure type for beginners?
The envelope flap closure is the easiest for beginners. It requires only straight seams and no special tools. You can complete a single-piece envelope cover in 10 to 15 minutes. This method is also fully machine washable, making it ideal for busy households.
How much fabric do I need for one pillow cover?
One yard of 45-inch to 60-inch wide fabric typically makes two standard pillow covers, such as 18-inch by 18-inch or 22-inch by 22-inch sizes. Always buy slightly more if using directional prints that require pattern matching.
Should I wash the fabric before making pillow covers?
Yes, always pre-wash fabric before cutting. This prevents shrinkage after sewing, which could make the cover too tight. Wash and dry fabric the same way you will clean the finished pillow, especially for cotton and linen.
How much smaller should the cover be than the pillow insert?
Cut the cover 1 inch smaller than the insert on each side. For example, use an 18-inch by 18-inch cover for an 18-inch by 18-inch insert. This slight tension creates a plump, professional look rather than a sloppy, flat appearance.
Can I make pillow covers without a sewing machine?
Yes, you can hand-sew envelope covers using a needle and thread. The invisible ladder stitch creates a seamless, high-end finish. However, this method takes 45 to 60 minutes and is not easily removable for washing.