
Sewing a pillowcase is one of the best beginner sewing projects you can tackle. With straight seams, minimal pieces, and no zippers or buttons, it builds confidence quickly while delivering instant satisfaction. Whether you want matching bedding, personalized gifts, or to donate to charity, learning how to sew a pillowcase for beginners gives you practical skills that transfer to tote bags, aprons, and more.
This guide covers six proven methods, from the popular burrito roll technique to the envelope closure. You’ll find exact measurements, step-by-step instructions, and pro tips to avoid common mistakes. Let’s get started.
Choose the Right Pillowcase Size for Your Pillow
Getting the dimensions right ensures a snug but easy fit over your pillow insert. Always measure your actual pillow since manufacturer labels vary.
Standard Pillow Insert Sizes
| Size | Dimensions |
|---|---|
| Standard | 20″ × 26″ |
| Queen | 20″ × 30″ |
| King | 20″ × 36″ |
Finished Pillowcase Dimensions
Add 1-2 inches in length for easy insertion and removal.
| Size | Finished Size |
|---|---|
| Standard | 21″ × 27″ |
| Queen | 21″ × 31″ |
| King | 21″ × 37″ |
Pro Tip: For directional prints with words or animals, cut fabric longer to prevent upside-down designs.
Gather Essential Tools and Materials
You need minimal supplies for this project. Most are already in a basic sewing kit.
Recommended Fabrics for Beginners
- Quilting cotton (100%) — stable, easy to cut, tons of prints
- Cotton flannel — soft and cozy; pre-wash to prevent shrinkage
- Cotton blends — acceptable but may wrinkle more
- Avoid slippery fabrics like satin or rayon until you gain experience
Essential Tools Checklist
- Sewing machine with straight stitch
- Iron and ironing board
- Scissors or rotary cutter with mat
- Straight pins or sewing clips
- Seam gauge
- Bamboo turning tool or chopstick
- Matching cotton thread
- Seam ripper for corrections
No serger needed. French seams or zig-zag stitches work perfectly for finishing edges.
Fabric Yardage Requirements
| Pillowcase Size | Main Fabric | Cuff (Optional) |
|---|---|---|
| Standard | 1 yard | 1/3 yard |
| Queen | 1.25 yards | 1/3 yard |
| King | 1.5-2 yards | 1/2 yard |
Critical: For directional prints, use 1.5 yards to align patterns correctly.
Burrito Method: Professional Finish Without a Serger
This clever technique rolls fabric like a burrito to hide seams inside the cuff. No raw edges visible, no serging required.
Why This Method Works
- Encloses all raw edges cleanly
- No visible stitching on the inside
- Works with or without a contrasting cuff
- Great for gifts and matching bedding sets
Cut Your Fabric Pieces
- Main piece: 42″ × 29″
- Cuff: 42″ × 9″
- Accent strip (optional): 42″ × 2″, folded in half
Step-by-Step Assembly
- Place cuff fabric right side up on your work surface.
- Lay main fabric on top, right sides together, aligning one long edge.
- Insert accent strip between layers at the top if using.
- Roll the main fabric tightly toward the center of the cuff, like a burrito.
- Fold the bottom of the cuff up to meet the top edge.
- Pin or clip all layers together securely.
- Sew along the exposed edge with a 1/4″ seam allowance. Backstitch at both ends.
- Gently pull the main fabric out through the open end.
- Press the seam flat and smooth the cuff.
Finish the Cuff
Stitch 1/8″ from the inner seam on the cuff side using a longer stitch (3.0-3.5 mm) for a decorative look. Press again for a crisp finish.
Pro Tip: Don’t sew through the rolled fabric. Only stitch the outer seam.
French Seam Method: Durable Enclosed Edges
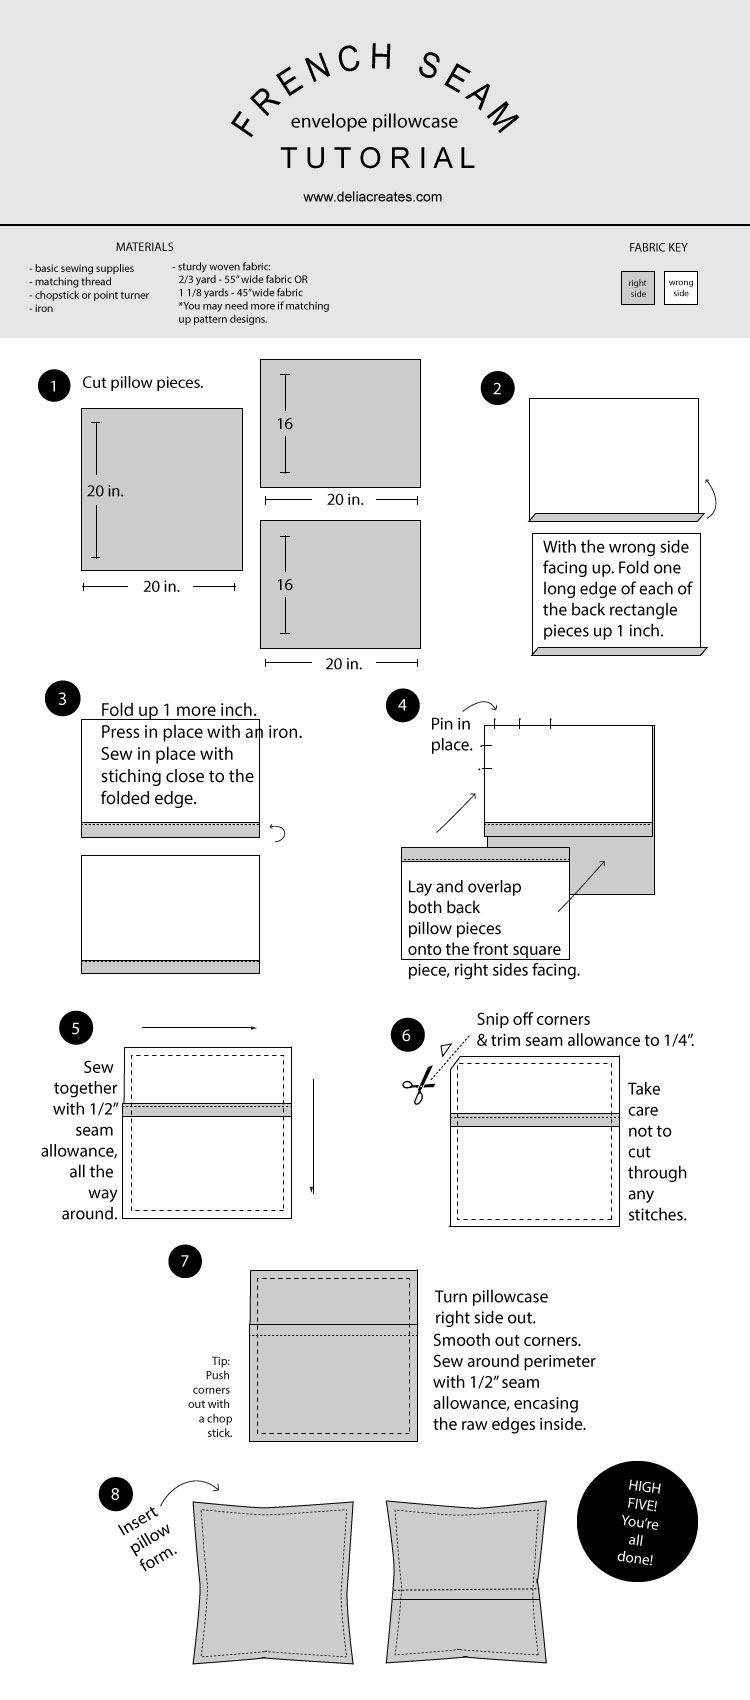
This method uses two seams to fully encase raw edges, perfect for frequent washing. Ideal for children’s rooms or guest bedding.
Cut Your Fabric
- One piece: 36″ × 43″ (selvage to selvage)
- Or two pieces: 21″ × 29.5″ for faux cuff version
Step-by-Step French Seaming
- On one long edge, fold 1/2″ toward the wrong side and press.
- Fold another 4 inches over to create the cuff. Press again.
- With wrong sides together, pin the three open edges (two sides and bottom).
- Sew with a 1/4″ seam allowance. Backstitch at start and end.
- Turn the case wrong side out so the first seam is on the outside.
- Use a bamboo tool to push out corners neatly.
- Press the seam flat.
- Turn right side out. Sew with a 1/2″ seam allowance, enclosing the first seam completely.
- Press one final time.
Result: A clean interior with no fraying, even after many washes.
Tube Method: Fastest Technique for Beginners
Used in charity projects like One Million Pillowcases, this method is quick and produces seamless results.
Cut Your Pieces
- Main fabric: 27″ long (selvage to selvage)
- Cuff: 9″ square
- Flap: 1″ × 2″ scrap
Assembly Steps
- Layer from bottom to top: cuff (right side up), main fabric (right side up), flap on top.
- Roll tightly into a tube, pinning the top edge.
- Sew a 1/2″ seam along the long edge.
- Unroll completely — now it looks like a pillowcase.
- Fold in half, right sides together.
- Sew across the top and down one side with a 1/2″ seam.
- Clip corners, turn right side out.
No visible seams on the cuff. Clean and professional.
Envelope Closure: Keeps Pillow Secure
This style folds over like a jacket, preventing the pillow from slipping out. Perfect for decorative pillows.
Cut the Pieces
- Front: 21.5″ × 23″
- Back (flap): 35″ × 23″ (standard), 39″ × 23″ (queen), 45″ × 23″ (king)
- Border (optional): 15″ × 23″
- Accent trim: 2.5″ × 23″
Step-by-Step Assembly
- Place back piece right side down, hemmed edge on the right.
- Fold one short edge 1/2″, then another 1/2″ to create a double hem. Stitch close to inner fold.
- Add front piece right side up, aligning raw edges on the left.
- Pin all layers together.
- Sew around three sides with 1/2″ seam allowance.
- Trim to 1/4″, clip corners, turn wrong side out.
- Sew again with 1/2″ to enclose raw edges completely.
- Fold flap over, press.
How to Finish Seams to Prevent Fraying
Never leave raw edges. Choose a method matching your tools and fabric.
Seam Finishing Options
| Method | Best For |
|---|---|
| French seam | Beginners, cotton, frequent washing |
| Serged edge | Flannel, knits, professional finish |
| Zig-zag | No serger available |
| Pinking shears | Lightweight fabrics, quick fix |
| Flat-felled | Durability, clean interior |
French seams are ideal for washable bedding.
Pro Tips for Perfect Results
These secrets separate amateur results from professional-looking pillowcases.
- Press every step. Ironing makes the biggest difference in your final look.
- Trim selvages before cutting for accurate width.
- Label the right side with a safety pin to prevent confusion.
- Use quality thread to avoid tangles and breaks.
- Backstitch at start and end of all seams.
- Pin every 2-3 inches to prevent misaligned edges.
- Don’t stretch fabric while sewing — let the machine feed fabric naturally.
Sharp corners: Use a chopstick to push them out before pressing.
Common Mistakes to Avoid
Fix these issues before they ruin your project.
- Cuff looks uneven — Use a seam gauge for exact folds
- Fabric puckers — Pin evenly, don’t stretch while sewing
- Corners not sharp — Use bamboo tool, press carefully
- Cuff twists — Pin all layers before sewing
- Print upside down — Cut with 1.5 yards for directional fabric
- Seams fray — Use French seam or zig-zag finish
- Wavy hems — Press thoroughly, don’t stretch fabric
When in doubt, unpick and re-sew. A seam ripper is your friend.
Frequently Asked Questions About Sewing Pillowcases
How long does it take to sew a pillowcase?
Most methods take 15-30 minutes. The envelope closure takes up to 2 hours due to the double hemming.
What thread should I use for pillowcases?
Cotton thread works best for cotton fabrics. Use matching color for invisible seams or contrasting color for decorative topstitching.
Do I need to pre-wash my fabric?
Yes, especially for cotton flannel. Pre-washing prevents shrinkage after the first wash and removes chemical finishes.
Can I make a pillowcase without a sewing machine?
Absolutely. Hand-sewing with a slip stitch or running stitch works, though it takes longer. A sewing machine with basic straight stitch is all you need.
How do I choose the right fabric for a pillowcase?
Quilting cotton is best for beginners. It’s stable, easy to cut and sew, and holds up well to washing. Avoid slippery fabrics until you gain experience.
What’s the easiest pillowcase method for complete beginners?
The faux cuff method or tube method are fastest and simplest. Both skip the burrito rolling technique that can confuse beginners.
Key Takeaways for Your First Pillowcase Project
Sewing a pillowcase is the perfect first project because it uses only straight seams, minimal pieces, and basic tools. Pick one method that matches your skill level and fabric choice, then practice — your second pillowcase will look even better than your first.
The burrito method gives professional results without a serger. The French seam method provides durability for frequent washing. The tube method is fastest for charity projects. Choose based on your goals.
Grab your fabric, thread your machine, and start sewing. Once you complete your first pillowcase, you’ll have skills that apply to countless other projects. Happy sewing.