
You have washed and dried your bedding, but the fitted sheet remains a crumpled mess in your hands. This common frustration happens because the elastic edges resist standard folding methods, leaving you with a tangled ball of fabric instead of a neat stack.
Learning how to fold fitted sheets properly solves this problem by using a specific corner-nesting technique. This guide teaches you the fastest arm-based method, explains why older tricks fail on modern sheets, and provides expert tips for perfect linen storage.
Master the Quarter-Sheet Arm Technique
The most efficient way to fold a fitted sheet uses your arms as a temporary frame. This method requires no large table and transforms the 3D shape into a flat rectangle in under a minute.
Step 1: Hold and Pair the First Two Corners
Start with the sheet inside-out so the patterned side faces out when finished. Insert your dominant hand into one corner pocket and grab the seam at the tip. Reach across with your other hand to grab an adjacent corner. Bring these two corners together and tuck one inside the other so they nest neatly.
- Think of this as “kissing corners” where you touch the tips then invert one over the other.
- Keep the elastic edges aligned to prevent twisting later.
- One hand now holds two nested corners while the rest of the sheet drapes down.
Step 2: Find and Pair the Remaining Two Corners
Use your free hand to trace the loose elastic edge until you find the third corner. Slide your hand into this pocket and reach for the fourth corner nearby. Match the seams of these two corners and nest them together just like the first pair.
- Ensure the fabric hangs loosely between your hands without twisting.
- If the sheet feels tight or tangled, shake it gently to let gravity align the fibers.
- You should now have a pair of nested corners in each hand.
Step 3: Combine Both Pairs Into One Hand
Bring the two pairs of corners together to consolidate the sheet. Take the pair in your non-dominant hand and flip it over the pair held in your dominant hand. All four corners are now stacked and hidden inside a single pocket.
- The sheet now hangs like a heavy cape with the bulky elastic at the top.
- This creates the critical “quarter-sheet” state needed for final folding.
- Check that all elastic is contained within the nested pocket before proceeding.
Step 4: Final Fold Into a Compact Bundle
Lay the bundle on a flat surface or hold it steady in your hand. Smooth the fabric downward to form a rough rectangle, acknowledging that perfect 90-degree angles are impossible due to tension. Fold the left side to the center, then fold the right side over it.
- Fold the bottom third of the sheet upward.
- Fold the top bulky section down over the rest to encase the elastic.
- Flip the bundle so the cleanest edge faces outward for storage.
Use the Flat Surface Method for Large Sheets

This alternative approach offers more control for beginners or extra-deep king-size sheets. It requires a workspace larger than the sheet itself, such as a bed or clean floor.
Prepare and Align the Sheet
Place the fitted sheet upside-down on your surface with the elastic ruffles facing up. Tug the corners gently to form a recognizable rectangle. Smooth the fabric thoroughly to remove air pockets and major wrinkles before attempting any folds.
Execute Vertical and Horizontal Folds
Fold one vertical third of the sheet toward the center and smooth it flat. Fold the opposite vertical third over the first layer to create a long strip. Rotate your position or the sheet to fold the bottom third up, then fold the top third down.
- Press gently to compact the elastic bulk within the layers.
- Ensure the raw edges are tucked inside the bundle for a clean look.
- This method takes slightly longer but reduces the chance of twisting.
Avoid These Common Folding Mistakes
Many people struggle because they use outdated techniques designed for older sheet styles. Understanding these errors helps you achieve consistent results every time.
The One-at-a-Time Trap
A common error involves nesting the first two corners and then immediately wrapping the third and fourth corners over them sequentially. This causes modern full-perimeter elastic sheets to twist into an unmanageable knot.
- Always pair corners in two separate sets before combining them.
- Maintain tension control by keeping pairs distinct until the final step.
- Reset and shake the sheet if you feel resistance or twisting during the process.
Fighting the Elastic Tension
Attempting to force perfect geometric lines fights the natural curve of the elastic. This aggression creates wrinkles and makes the final bundle bulky and uneven.
- Work with the curve of the sheet rather than against it.
- Aim for a “good enough” rectangle instead of mathematical perfection.
- Smooth the fabric gently rather than stretching it taut.
Optimize Results With Fabric Knowledge
Different materials and elastic placements affect how your sheet behaves during folding. Adjust your technique based on the specific properties of your linens.
Consider Elastic Placement and Depth
Modern sheets typically feature elastic running along the entire perimeter, which requires the paired corner method. Vintage or budget sheets may only have elastic at the four corners, making them easier to fold but less secure on the mattress.
- Deep pocket sheets (13 inches or more) create a thicker corner bundle.
- Extra-deep sheets may require an additional fold to reduce bulk.
- Identify your sheet type before starting to choose the best approach.
Adapt to Fabric Types
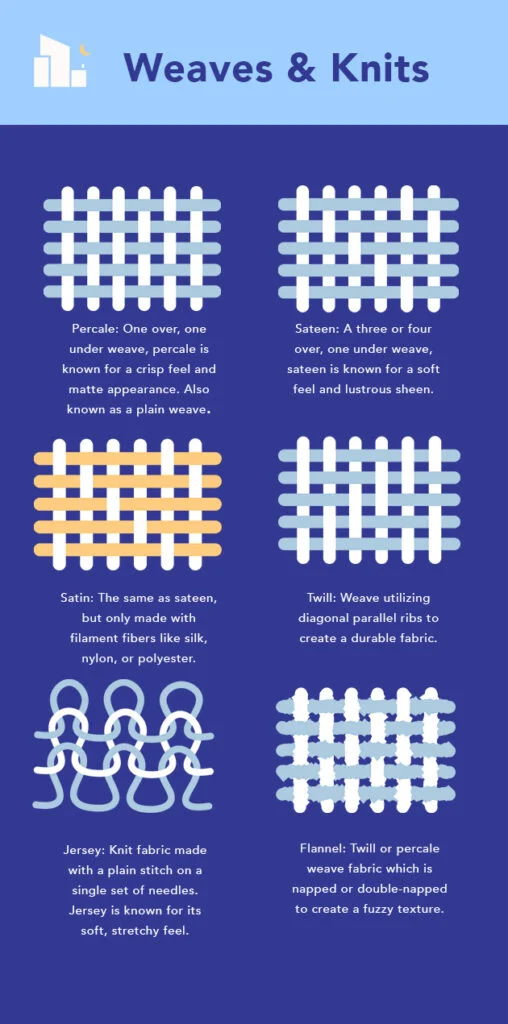
Cotton percale sheets are crisp and hold folds well, making them ideal for neat stacks. Flannel sheets are bulkier and less precise, so focus on neatness rather than sharp creases. Jersey or stretch fabrics cling to themselves and require aggressive smoothing at each step.
- Remove cotton sheets from the dryer while slightly damp for easier folding.
- Smooth stretchy fabrics frequently to prevent them from bunching up.
- Accept that flannel will always appear slightly thicker when folded.
Store Folded Sheets Effectively
Proper storage maintains your hard work and keeps your linen closet organized. How you place the sheet on the shelf matters as much as how you fold it.
Arrange by Set and Orientation
Fold your fitted sheet, flat sheet, and pillowcases together as a single unit. Tuck the pillowcases inside the folded fitted sheet to keep the set together and save space. Place the bundle on the shelf with the smooth edge facing forward.
- Store heavier sets like king-size or flannel at the bottom of the stack.
- Use vertical file-style stacking for deep shelves to see all sets easily.
- Keep the bulkiest folded edge against the back of the shelf for stability.
Maintain Neatness Over Time
Sheets can unravel if not stored correctly or if the fold is too loose. Ensure your final fold is compact enough to hold its shape without constant adjustment.
- Press the final bundle firmly to set the layers.
- Avoid overfilling shelves, which can push bundles out of shape.
- Refold sets immediately after use to maintain the habit.
Understand Fitted Sheet History and Evolution
Knowing why fitted sheets are difficult to fold helps explain why old methods fail. The design has evolved significantly over the last few decades, changing the rules of folding.
Trace the Design Timeline
Bertha Berman patented an early multi-piece fitted design in 1959. Belvin Roddey improved the concept with sewn elastic edges in 1965. Gisele Jubinville patented the modern full-perimeter elastic design in 1992, which is now the standard.
- Sheets in the 1980s often had elastic only at the corners.
- The shift to full-perimeter elastic increased tension and twisting issues.
- Old folding tutorials often ignore this critical design change.
Recognize Why Old Methods Fail
The “one-at-a-time” folding method worked well when sheets only had corner elastic. Today’s full-perimeter elastic creates uniform tension that causes twisting when using sequential folding methods.
- Modern sheets require paired corner nesting to manage tension.
- Acknowledge that your frustration stems from design evolution, not lack of skill.
- Adapt your technique to match the specific construction of your linens.
Frequently Asked Questions About Folding Fitted Sheets
Why does my fitted sheet always twist into a knot?
Your sheet likely twists because you are nesting corners one by one instead of in pairs. Modern sheets have elastic all around the edge, which causes tangling if you do not pair corners separately before combining them.
Can I fold a fitted sheet without a large table?
Yes, the arm-based quarter-sheet method requires only standing room. You hold the corners in your hands to create the shape, eliminating the need for a large flat surface like a bed or table.
How do I stop the elastic bulk from making a lump?
You cannot eliminate the bulk entirely, but you can hide it. Fold the top section containing the nested corners down over the rest of the sheet to encase the thick elastic within the smoother fabric layers.
Does the fabric type change how I should fold it?
Yes, cotton holds creases well while jersey clings to itself. Smooth stretchy fabrics aggressively at each step and accept that flannel will result in a thicker final bundle than crisp percale.
When was the modern fitted sheet invented?
While early patents exist from 1959 and 1965, the modern design with full-perimeter elastic became standard after a 1992 patent. Before this, many sheets only had elastic at the four corners.
Key Takeaways for Folding Fitted Sheets
Mastering how to fold fitted sheets relies on pairing corners in two separate sets before combining them. This simple adjustment prevents the twisting that plagues older folding methods and works for all modern sheet types.
Start with the sheet inside-out, nest your corner pairs, and fold the elastic bulk inward. With a little practice, this process becomes quick muscle memory that keeps your linen closet neat and organized.