

Making fitted bed sheets solves the endless frustration of loose linens that slip off the mattress corners during the night. You can create custom, durable bedding that fits your specific mattress depth perfectly by following precise measurement formulas and sewing techniques.
This guide details exactly how to measure your bed, calculate fabric needs, and sew secure corners with elastic or deep pockets. You will learn professional methods to convert flat sheets or cut new fabric for a snug, store-quality finish without the high price tag.
Measure Your Mattress for a Custom Fit
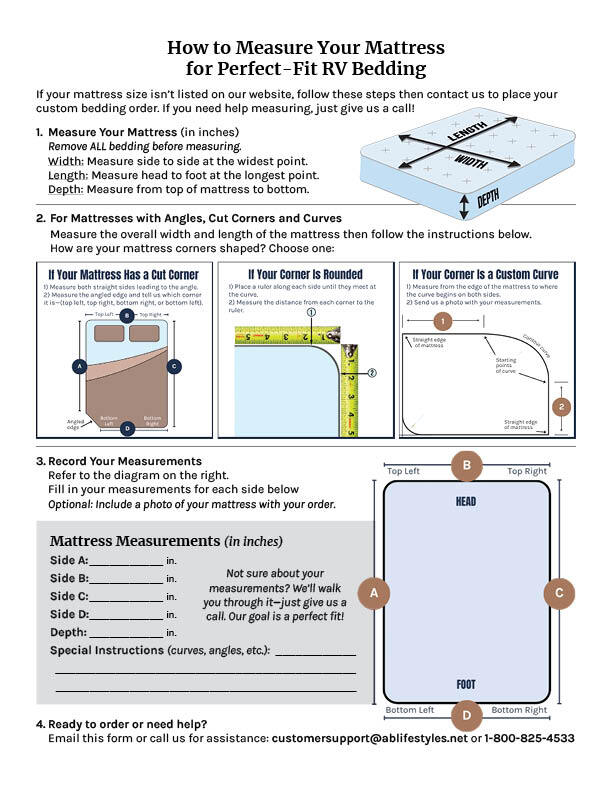
Accurate measurements are the foundation of a successful project because guessing leads to ill-fitting results. You must account for the width, length, and total height of your mattress to ensure the sheet wraps underneath securely.
Record Width Length and Height Dimensions
Use a tape measure to capture three specific numbers before cutting any material.
* Width: Measure from the left edge to the right edge across the top.
* Length: Measure from the head of the bed to the foot.
* Height: Measure from the top surface down to the bottom edge including any pillow top.
Write these numbers down clearly as you will use them in your calculations.
Apply the Plus Six Formula for Imperial Users
This standard formula ensures you have enough fabric to wrap under the mattress and hem the edges. Add the mattress dimension to twice the height plus six inches for seam allowance.
* Calculate width by adding double the height and six inches to the mattress width.
* Calculate length by adding double the height and six inches to the mattress length.
* Cut your fabric rectangle to these final dimensions for a perfect fit.
Use the Metric Addition Method for Precision
Metric users should add one centimeter to width and length for ease before calculating depth. Combine the mattress thickness with your desired fold amount to determine total depth per side.
* Multiply the total depth by two and add it to your base width and length.
* Add an extra two centimeters around the entire perimeter for seam allowances.
* This method prevents gaps and ensures the fabric does not stretch too thin.
Choose and Prep the Right Fabric Type
Selecting the correct material determines how comfortable your bed feels and how long your handmade sheet lasts. High-quality woven fabrics hold their shape better than stretchy knits during the sewing process.
Pick High Quality Cotton or Blends
Opt for breathable materials that feel good against your skin night after night.
* 100% Cotton Percale: Offers a crisp cool feel and long-lasting durability.
* Cotton Sateen: Provides a smoother texture with a subtle luxurious sheen.
* Cotton-Poly Blends: Resist wrinkles well but may feel less breathable than pure cotton.
Avoid using stretchy knit fabrics unless you have advanced sewing experience since they are difficult to measure accurately.
Use 108 Inch Wide Fabric When Possible
Standard fabric widths often require sewing a center seam which can be uncomfortable. Using 108-inch wide fabric eliminates this seam for queen and king beds resulting in a smoother surface. This wide format creates a professional finish with fewer weak points where tearing could occur.
Always Pre Wash and Iron Fabric
Never skip the pre-washing step because cotton shrinks significantly during the first wash. Wash and dry your fabric using the same settings you plan to use for the finished sheet to prevent future sizing issues. Iron the fabric flat afterward since wrinkles distort measurements and lead to crooked cuts.
Cut Corners for Deep Pockets

Creating depth requires cutting squares from each corner so the fabric can wrap around the mattress edges effectively. This step transforms a flat rectangle into a three-dimensional shape.
Mark and Cut 14.5 Inch Corner Squares
For a standard mattress with a moderate fold you will typically cut 14.5-inch squares from each corner.
1. Measure 14.5 inches inward from the corner along both edges.
2. Draw perpendicular lines connecting these marks to form a square.
3. Cut out the square completely to create a triangular flap.
Use tailor’s chalk and a clear ruler to ensure your lines are straight and precise.
Adjust Depth Based on Mattress Height
Taller mattresses require deeper cuts to accommodate the extra thickness of the bed.
* Cut 16-inch squares for a 12-inch thick mattress.
* Cut 18-inch squares for mattresses 14 inches or deeper.
* Add extra tuck-under allowance for very thick pillow-top beds.
Each cut allows the sheet to stretch down and grip the underside of the mattress firmly.
Sew Secure Corner Seams
The way you sew the corners determines how snug and durable the fit will be over time. Proper technique prevents the corners from popping off during sleep.
Join Triangular Flaps with Diagonal Seams
Bring the raw edges of the cut corner together so the right sides of the fabric face each other.
1. Turn the fabric so the wrong side is facing up.
2. Pin along the diagonal line where the two flaps meet.
3. Sew a straight stitch 5/8 inch from the raw edge.
4. Backstitch at the start and end to lock the stitches in place.
Repeat this process on all four corners of your sheet.
Trim and Reinforce for Flat Corners
Reducing bulk in the seam allowance helps the corner lie flat against the mattress. Trim the excess fabric down to ¼ inch after sewing the initial line. Press the seams open with an iron to flatten them completely. Sew a second line ½ inch from the edge for extra strength and to prevent fraying.
Create a Clean Elastic Casing
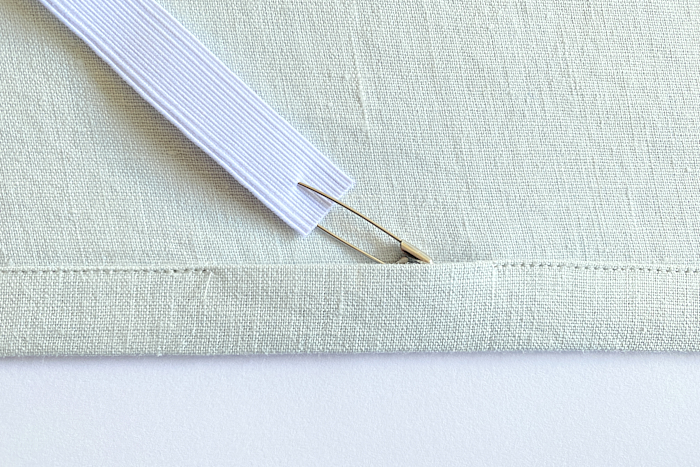
A continuous channel around the edge holds the elastic that keeps the sheet tight and secure. This casing protects the elastic and distributes tension evenly.
Fold and Hem for a Double Layer Casing
Create the channel by folding the entire perimeter of the sheet toward the wrong side.
* Fold the edge over ¼ inch first to encase the raw edge.
* Fold it over again by ½ inch to create the full casing width.
* Stitch close to the inner fold leaving a small gap to insert the elastic later.
Use a walking foot on your sewing machine if it struggles to feed the thick layers smoothly.
Cut Elastic to Two Thirds the Perimeter
Elastic must be shorter than the fabric to create the necessary tension for a snug fit. Measure the distance between your corner seams and cut the elastic to two-thirds of that length.
* For high-stretch fabric reduce the elastic length to 60% for a tighter grip.
* You can use one continuous loop or four separate pieces for each side.
Thread and Secure the Elastic Properly
Proper installation ensures even tension and prevents the sheet from twisting on the bed.
Use a Safety Pin to Feed Elastic
Attach a large safety pin to one end of your elastic strip to act as a guide. Insert the pin into the casing opening and feed it around the entire perimeter of the sheet. Pull carefully until the pin emerges at the starting point without twisting the elastic band.
Overlap and Lock Elastic Ends
Once both ends of the elastic are out overlap them by ½ inch. Sew them securely using a box stitch pattern or multiple backstitches to ensure they do not separate. Distribute the gathers evenly by smoothing the fabric along the edge before closing the casing gap.
Try the No Elastic Deep Pocket Method
Some sewers prefer to skip elastic entirely by using a double-layer design that relies on depth and weight. This method is excellent for those with elastic allergies or who want a minimalist construction.
Make Two Identical Fitted Layers
Cut two rectangles using the same size formula you used for the single layer method. Sew the corner seams on both layers separately following the standard diagonal seam technique. This creates two identical fitted shells ready for assembly.
Join Layers with a Perimeter Seam
Place the two layers right sides together and align all edges perfectly.
1. Sew around all edges with a ½-inch seam allowance.
2. Leave a 6-inch gap on one side for turning.
3. Turn the entire assembly right side out through the opening.
4. Use a chopstick to push out the corners sharply.
Press the sheet flat and topstitch around the entire edge to close the gap and secure the layers.
Convert a Flat Sheet Into a Fitted One
Repurposing an old or oversized flat sheet is a sustainable way to create custom bedding with minimal sewing. This method saves time and reduces waste.
Cut Corners and Sew Pockets
Measure and cut 14.5-inch squares from each corner of your existing flat sheet. Sew diagonal seams as described in the standard method to create the basic fitted shape. Trim and press the seams for a clean finish.
Add Corner Elastic for Grip
Instead of a full casing you can attach elastic only to the corners for a quicker solution.
* Cut four pieces of elastic sized to the mattress side minus the depth.
* Fold the edge over ½ inch at each corner to create a small pocket.
* Insert one elastic piece into each corner fold and stretch it while sewing.
* Secure the ends with knots or backstitching to maintain tension.
Finish with Professional Details
Elevate your handmade sheet from a basic DIY project to a high-end luxury item with smart finishing touches. These details improve durability and appearance.
Use French Seams for Clean Interiors
French seams are ideal for wide-format sheets as they encase all raw edges completely.
1. Sew the corner seams with wrong sides together first.
2. Trim the seam allowance down to ⅛ inch.
3. Fold the fabric so right sides face and sew again ¼ inch from the edge.
This technique prevents fraying and creates a smooth interior with no bulk.
Press After Every Step
Ironing seams open after sewing ensures the final product lies smoothly on the bed. Press the final hem and corners to set the shape permanently. A well-pressed sheet looks professionally made and feels more comfortable.
Add Topstitching for Durability
Sew a visible line ¼ inch from the hem edge to reinforce the casing. This prevents the elastic from slipping inside the channel and gives the sheet a tailored appearance. It also adds an extra layer of strength to high-stress areas.
Troubleshoot Common Fitting Issues
Even careful work can encounter problems but most issues have simple fixes. Knowing what to look for helps you correct mistakes quickly.
Sheet Slips Off Corners
This issue usually occurs because the elastic is too long or was not stretched enough during sewing. Replace the elastic with a shorter piece closer to 50% of the span or deepen your corner cuts.
Wrinkles Along Edges
Inconsistent gathering or failing to stretch the fabric while attaching elastic causes wrinkles. Stretch the fabric ahead of the needle when zig-zag stitching or use a walking foot for even feeding.
Too Tight to Fit
Overly aggressive elastic or miscalculated depth makes the sheet impossible to put on. Increase your cut size by 1–2 inches or use slightly longer elastic to reduce tension.
Bulky or Lumpy Corners
Excess seam allowance creates uncomfortable lumps in the corners. Trim the seam allowance to 3 mm after the first stitch and consider using French seams to reduce bulk.
Compare Construction Methods
Different methods suit different needs and skill levels so choose the one that fits your situation.
| Method | Best For | Difficulty | Elastic Needed | Key Benefit |
|---|---|---|---|---|
| Standard Elastic | Everyday use | Intermediate | Yes | Snug and reliable fit |
| No-Elastic Deep Pocket | Sensitive skin | Beginner | No | No elastic wear and durable |
| Wide-Format French Seam | Queen and King beds | Advanced | Yes | Seamless width and luxury finish |
| Flat Sheet Conversion | Quick DIY projects | Beginner | Optional | Eco-friendly and low cost |
Select the approach that matches your tools time availability and desired outcome.
Final Quality Check Before Use
/bhg-how-to-hospital-corners-hero-1_CpConBPXKA99F_WAnoF-ux-3d6ad80530e349a581b4b8d582938b9a.jpg)
Perform a final inspection before washing or using your new creation to ensure success. Test the fit by stretching it onto the mattress to verify it snaps on securely. Check all corners for loose stitches or excessive bulk that could cause discomfort. Ensure the elastic tension is even and the ends are locked tightly. Run your hand over the top surface to confirm there are no puckers or gathers showing. A final press removes any last wrinkles and sets the shape perfectly.
Frequently Asked Questions About Making Fitted Bed Sheets
How much fabric do I need to make a fitted sheet?
You need fabric equal to your mattress width and length plus twice the height plus six inches for hems. For a queen bed this often requires 3 to 4 yards of 108-inch wide fabric or more if using standard width.
Can I make a fitted sheet without elastic?
Yes you can use the no-elastic deep pocket method which relies on double layers and deep cuts to stay in place. This method uses friction and weight rather than tension to secure the sheet to the mattress.
What is the best fabric for beginner sewers?
100% cotton percale or twill is best because it is stable and easy to cut accurately. Avoid slippery silks or stretchy knits until you gain more confidence with your sewing machine.
How do I stop my homemade sheet from shrinking?
Pre-wash and dry your fabric before cutting it to account for any potential shrinkage. Use the same water temperature and dryer settings you plan to use for the finished sheet.
Why do my corners pop off the mattress?
This usually happens if the corner cuts are too shallow or the elastic is not tight enough. Deepen your corner squares or shorten the elastic length to increase tension and grip.
Key Takeaways for Making Fitted Bed Sheets
Creating your own fitted bed sheets allows you to customize the fit and fabric to your exact preferences. By measuring accurately using the plus-six formula and pre-washing your fabric you avoid common pitfalls like shrinkage and poor fit. Whether you choose the standard elastic method or the no-elastic deep pocket design the result is comfortable durable bedding tailored to your bed.
Start by measuring your mattress today and selecting a fabric you love for a rewarding sewing project. With these techniques you can produce high-quality linens that stay put night after night.