

Slipping into a bed with crisp, smooth sheets feels amazing, yet many people struggle to get that neat look at home. You might wrestle with a fitted sheet that pops off or end up with messy wrinkles that ruin the comfort of your sleep.
This guide shows you exactly how to put sheets on a bed using professional techniques for a perfect fit. You will learn to master hospital corners, choose the right sheet depth, and style your bedding like a hotel in under a minute.
Prepare Your Mattress Foundation for Smooth Sheets
A clean and dry mattress surface is essential before you add any linens. Any bumps or debris left on the mattress will create visible lumps under your new sheets.
Place a mattress topper or pad directly on the mattress to add plushness and protect against spills. Most toppers are machine washable, so keeping a spare ensures you always have a fresh layer ready for use.
Select the Right Topper for Your Needs
Choose a topper based on whether you need cooling features, extra softness, or firm support. This layer extends the life of your mattress while significantly improving your overall sleep quality.
Install the Fitted Sheet Using the Tag Method
The fitted sheet acts as the anchor for your entire bed setup. Proper installation prevents slipping and creates the tension needed for a neat appearance.
Locate the Tag for Correct Orientation
Most fitted sheets have a small tag sewn into one specific corner to help you orient it correctly. Place this tagged corner at the bottom right of the bed when standing at the foot and looking toward the headboard.
This standard placement ensures the sheet dimensions align with the mattress shape. It prevents the common frustration of the sheet ending up inside out or twisted after you make the bed.
Apply the U-Shape Drape Technique
Drape the sheet over the bed in a U shape rather than trying to fit corners one by one. This method stops the sheet from slipping off the opposite side while you work on securing the first corners.
Pulling the fabric tight becomes much easier when you use this draping approach. It keeps the sheet centered and reduces the time spent readjusting the fabric.
Use the Bear Claw Trick for Tight Corners

Insert your hand inside the sheet corner and grip the mattress edge like a bear claw if the fabric resists stretching. Pull downward smoothly to secure the corner over the mattress edge without the sheet snapping back.
This technique gives you better control over stubborn elastic bands. It helps you achieve a snug fit even with deep or heavy mattresses.
Tighten the Sheet After Tucking Corners
Lift the sheet at each corner to tuck excess fabric tightly under the mattress once all four corners are loosely placed. Pull the entire sheet taut across the bed surface to eliminate sagging and wrinkles.
This two-step process ensures the sheet stays in place all night. A tight fit means you will not need to readjust your bedding in the morning.
Measure Mattress Depth to Prevent Popping Sheets
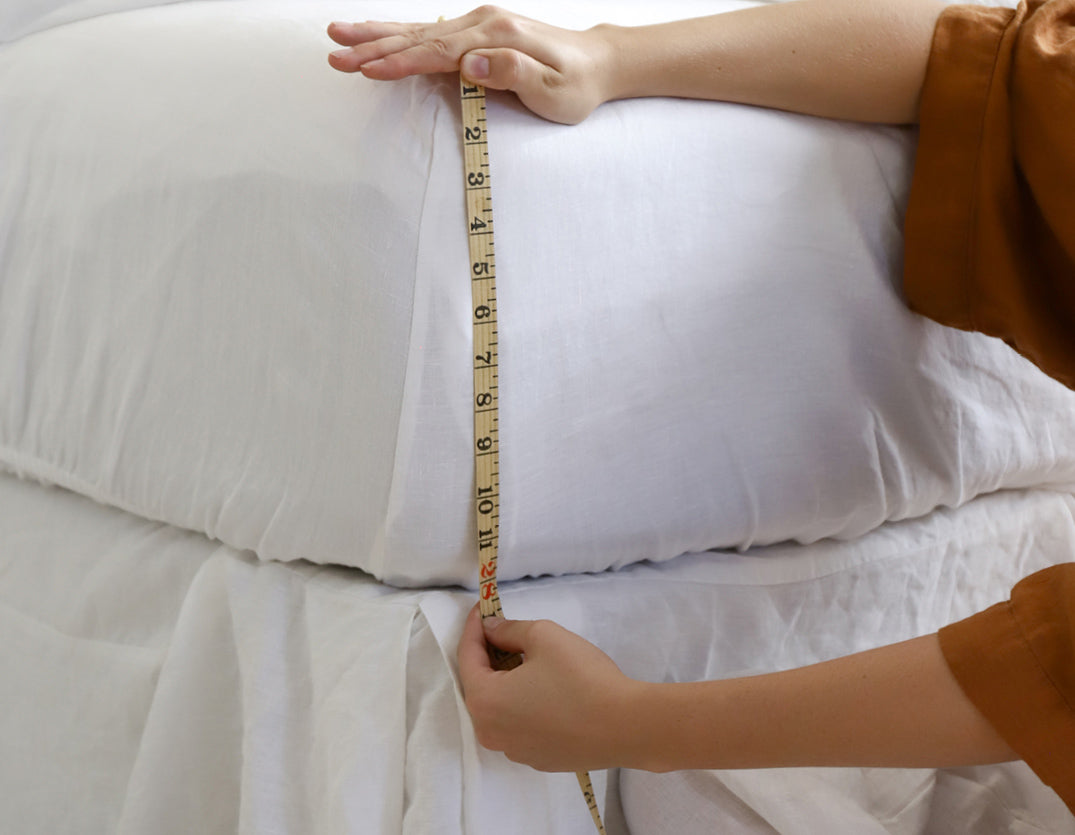
Ill-fitting sheets are the primary reason bedding pops off during sleep. You must measure your mattress depth accurately before purchasing new linens.
Calculate Required Pocket Depth
Measure your mattress from top to bottom using a tape measure. Include any topper you regularly use in this measurement to get an accurate total height.
Aim for a fitted sheet with at least 4 inches of extra depth beyond your mattress height. If your mattress is 12 inches tall, choose a sheet rated for 16-inch pockets to ensure a secure grip.
Avoid Consequences of Poor Fit
Sheets that are too shallow will constantly pop off the corners while you sleep. This ruins the appearance of your bed and requires frequent readjustment that disrupts your rest.
Investing in the correct depth saves time and frustration in the long run. Properly sized sheets stay secure and maintain a smooth surface for sleeping.
Lay the Flat Sheet Face Down for Polished Layers
The flat sheet adds a hygienic layer between you and the comforter while providing a polished finish. Correct placement is key to achieving that professional hotel look.
Orient Pattern Side Toward Mattress
Place the flat sheet face down on the bed so the pattern or finished side touches the mattress. This ensures that when you fold the top edge back later, the correct side of the fabric shows.
Leaving the pattern side down initially allows for a clean fold-over at the head of the bed. This simple step makes a huge difference in the final aesthetic of your bedding.
Allow Overhang at the Head of Bed
Leave a few inches of fabric hanging over the head of the mattress before tucking anything in. This excess length is crucial for creating the final fold-over cuff that showcases the layers.
Without this overhang, you cannot create the tailored look seen in luxury hotels. The extra fabric provides the material needed for the decorative fold.
Tuck the Bottom Edge First
Tuck the bottom edge of the sheet under the mattress at the foot of the bed to anchor it. You can do this loosely at first since you will tighten it during the hospital corner process.
Securing the foot of the sheet gives you a stable base to work from. It prevents the entire sheet from shifting while you focus on the sides.
Master the Hospital Corner Tuck for Security
The hospital corner technique keeps sheets secure and creates a crisp, clean edge that lasts all night. This method is the industry standard for a reason because it works effectively.
Step 1: Secure the Foot of the Sheet
Start by firmly tucking the bottom edge of the flat sheet under the mattress at the foot of the bed. This anchors the sheet and gives you a stable base for the next steps.
Ensure the fabric is smooth and free of large wrinkles before proceeding. A solid anchor point makes the rest of the process much easier to manage.
Step 2: Lift Side Fabric at 45 Degrees
Stand at the side of the bed and grab the hanging fabric on the side edge. Lift it upward at a 45-degree angle to form a triangular flap of fabric resting on top of the mattress.
Holding this triangle up with one hand keeps the workspace clear. The angle is critical for creating the correct shape for the tuck.
Step 3: Tuck Remaining Bottom Edge
Reach through the opening under the triangle with your other hand. Pull the remaining bottom edge of the fabric straight down and tuck it tightly under the mattress.
This step secures the excess fabric that would otherwise cause bulk. It creates a clean line along the side of the mattress.
Step 4: Drop and Tuck the Triangle
Let the triangular flap drop down over the side of the mattress smoothly. Tuck the remainder of the triangle neatly under the mattress to complete the corner.
Smooth out the seam to ensure there are no bumps or wrinkles. Repeat this entire process on the opposite side of the bed for consistency.
Insert Duvet Cover Using Inside-Out Method
Properly installing the duvet cover protects the insert and simplifies your cleaning routine. The inside-out method is the fastest way to get a evenly distributed fill.
Turn Cover Inside Out and Lay Flat
Turn the duvet cover inside out and lay it flat on the bed with the opening accessible. Place the duvet insert on top of the inside-out cover and center it evenly.
Tie the internal corner ties of the cover to the loops on the duvet insert. Do not pull these ties too tight as it can damage the fabric or make removal difficult.
Flip Cover Right Side Out
Reach through the open end of the duvet cover and grab the top two corners of the cover and insert combination. Pull them toward you to flip the cover right side out while pulling the insert inside simultaneously.
Shake the duvet gently to settle the insert and ensure corners are filled. Position any buttons or zippers at the bottom of the bed to keep them hidden.
Style Bedding With Perfect Drop and Folds

How you arrange the top layers affects both the look and comfort of your bed. Small adjustments create a tailored and inviting appearance.
Pull Covers Down 6 to 12 Inches
Grab the top edge of the flat sheet and the comforter together. Pull them down 6 to 12 inches from the top of the mattress to create a clean, tailored cuff.
This drop showcases the layers and adds visual interest to your bed. It creates a welcoming look that invites you to climb in.
Fold Flat Sheet Back Over Comforter
Fold the top of the flat sheet back over the comforter to form a neat border. This adds dimension and protects the duvet from oils and dirt on your skin.
Use a light sweeping motion to smooth the covers down from the top edge. Avoid over-fluffing as a clean drape looks more intentional and elegant.
Arrange Pillows for Hotel Quality Finish
Pillows are the finishing touch that complete the look of your bed. Proper arrangement adds structure and invites relaxation.
Place Sleeping Pillows With Openings Inward
Set your standard sleeping pillows against the headboard or wall first. Turn the pillowcase opening inward toward the center of the bed to hide the seam.
This creates a clean edge that looks polished and professional. It is a small detail that makes a big difference in the overall aesthetic.
Use Quick Chop for Decorative Pillows
Fold decorative pillows in half vertically and stand them upright for a structured look. This quick chop method creates an inviting appearance that looks intentional.
Arrange shams or boudoir pillows in front of the sleeping pillows. You can stack them or place them side by side depending on your style preference.
Save Time With Efficient Bed Making Methods
You do not need to spend minutes making your bed every day. Efficient methods let you finish fast without sacrificing quality or appearance.
Utilize Tuck and Tighten Strategy
Use the tuck and tighten method after placing the fitted sheet to eliminate sagging quickly. This approach cuts adjustment time and ensures a smooth surface immediately.
Focus on smoothness rather than excessive folding to save time. A clean drape is often better than a heavily manipulated one.
Achieve Full Bed Made in Under 60 Seconds
With practice, you can make your bed in under 60 seconds using these streamlined techniques. Professional methods can reduce bed-making time by up to 70 percent compared to traditional routines.
These rapid methods are perfect for busy mornings or guest rooms. They allow you to maintain a tidy home with minimal effort.
Avoid Common Sheet Fitting Mistakes
Even small errors can ruin the look and function of your freshly made bed. Avoiding these pitfalls ensures your hard work lasts through the night.
Do Not Ignore Mattress Depth Requirements
Using sheets that are too shallow for your mattress guarantees popping corners. Always match the pocket depth to your specific bed height including any toppers.
Do Not Skip the Tag Check
Placing the fitted sheet tag in the wrong corner leads to twisted fabric. Always check for the tag and place it at the bottom right to ensure proper alignment.
Do Not Rush the Hospital Corner Process
Half-finished tucks unravel quickly and look messy. Take a few extra seconds to do the hospital corners correctly so your sheets stay put all night.
Frequently Asked Questions About Putting Sheets on a Bed
How do I stop my fitted sheet from popping off the corners?
Ensure your fitted sheet has at least 4 inches of extra depth compared to your mattress height. Using the bear claw trick to pull corners down tightly also helps secure the fabric effectively.
Which corner should the tag on my fitted sheet go in?
Place the tagged corner at the bottom right of the bed when standing at the foot looking toward the headboard. This standard orientation prevents the sheet from being inside out or twisted.
What is the best way to put on a duvet cover alone?
Turn the cover inside out, lay the insert on top, tie the corners, and then pull the top corners through the opening to flip it. This method allows one person to insert a duvet easily without help.
How far down should I pull my comforter for a styled look?
Pull the top edge of your comforter and flat sheet down 6 to 12 inches from the head of the mattress. This creates a tailored cuff that showcases the layers beneath.
Can I make my bed in less than a minute?
Yes, using streamlined techniques like the U-shape method and avoiding over-tucking can help you make your bed in under 60 seconds. Practice makes these movements faster and more efficient.
Key Takeaways for Putting Sheets on a Bed Perfectly
Mastering how to put sheets on a bed transforms a daily chore into a quick, satisfying routine. By using the tag for orientation, measuring mattress depth accurately, and mastering the hospital corner tuck, you ensure a snug and wrinkle-free finish every time.
Start your next bed-making session with a clean foundation and apply these professional techniques to save time. Your bed will look polished and feel comfortable, offering a perfect retreat at the end of a long day.