
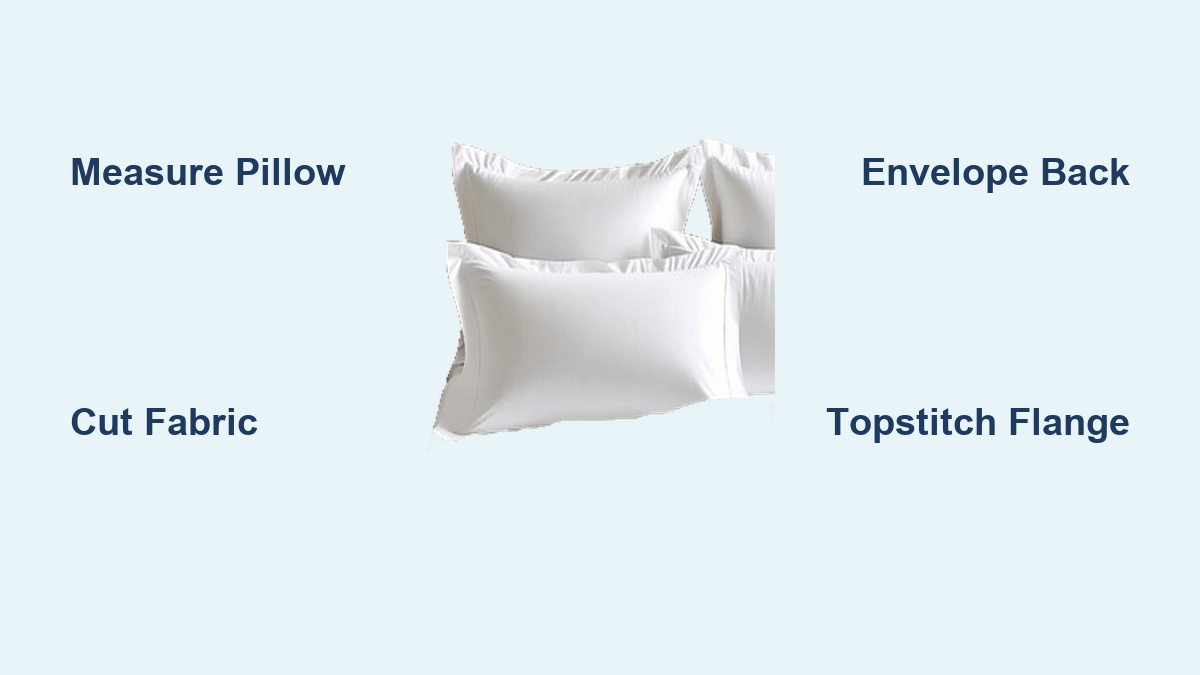
You love the look of a perfectly styled bed with crisp, tailored pillow shams, but store-bought options cost $30 to $60 each. What if you could make your own in under an hour for less than $10? Sewing a pillow sham is a beginner-friendly project that transforms fabric into a custom, high-end bedroom accent. Whether you are using vintage linen, repurposed curtains, or fresh decorator fabric, this guide walks you through every step.
You will learn how to choose the right size, cut precisely, assemble cleanly, and add flanges or envelope backs like a pro. By the end, you will have a beautiful sham that matches your style and saves you serious money.
Choose Your Sham Style
Pick a construction method based on your skill level and design goals. The right style affects durability, washability, and visual impact.
Envelope Back for Beginners
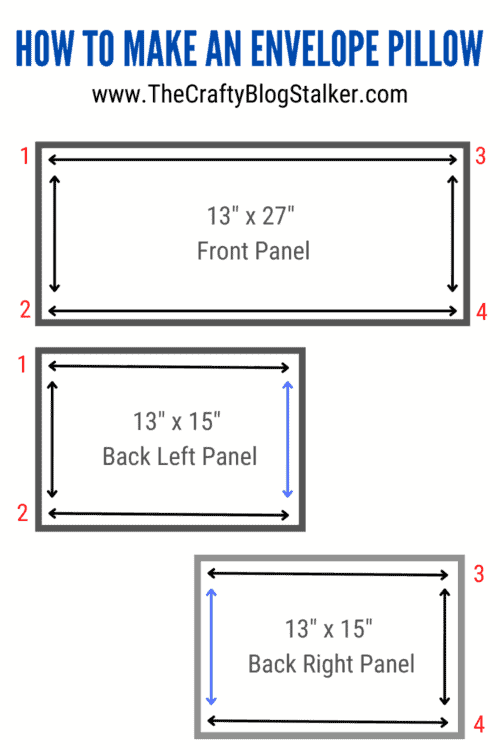
Ideal for first-timers, the envelope back uses overlapping panels to hide the pillow insertion point. No zipper or buttons required. Cut two back pieces: one full width, and a second split to create a 6 to 8 inch overlap. When closed, the flaps conceal the opening while allowing easy access. This method works best with medium-weight cotton, linen, or decorator fabric. Avoid stretchy knits unless stabilized with interfacing.
Flanged Sham for a Tailored Look
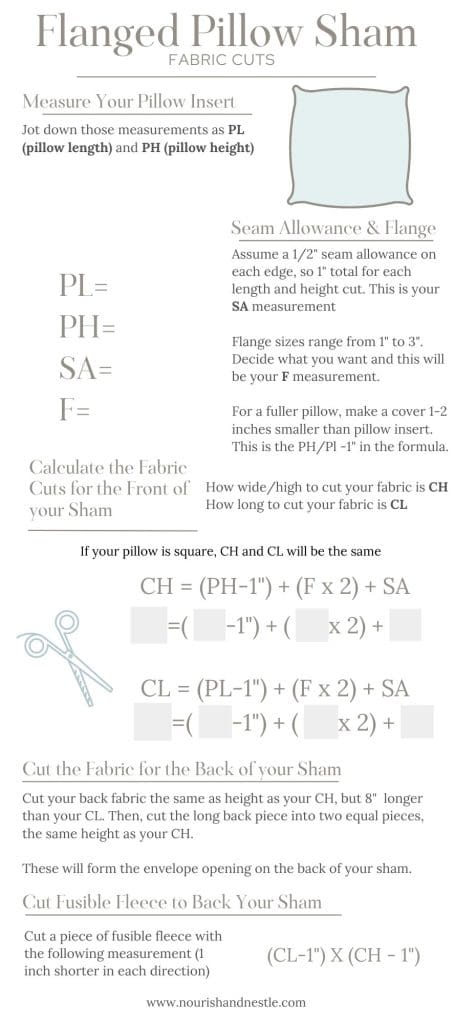
A flange adds dimension and polish to your sham. To create a 2-inch flange, add 4 inches to both length and width during cutting. After sewing the sham closed, press the seam flat and topstitch 2 inches from the edge. This technique tightens the fit and gives a custom, upholstered appearance. Use a walking foot if working with thick or slippery fabrics to prevent shifting.
Ruffled or Quilted Options
For softness and texture, add a ruffle before assembling the front and back. Gather a strip of fabric equal to the perimeter of the front panel, then attach it with a one-half inch seam. Ruffles suit nursery or cottage styles. Alternatively, quilt the front panel by layering fabric, batting, and backing, then stitch in straight lines or free-motion patterns for warmth and body.
Measure and Cut Fabric Accurately
Precision starts here. Even small measurement errors lead to loose or tight shams.
Measure Your Pillow First
Do not assume standard sizes. Use a tape measure to check your actual pillow dimensions. Width is measured between side seams, typically 20 inches. Length varies by size: 26 inches for standard, 30 inches for queen, and 36 inches for king. Always measure your insert since off-the-shelf pillows vary by brand.
Calculate Finished Sham Size
The finished sham should be 1 inch smaller than the insert for a snug, full look when stuffed. For example, a 20 by 26 inch pillow becomes a 19 by 25 inch finished sham. Add seam allowances and design elements. For no flange, cut the front panel at 20 by 26 inches. For a 2-inch flange, add 4 inches to both dimensions, cutting 24 by 30 inches. Label each cut piece with chalk.
Cut Back Panels for Envelope Closure
For a standard 20 by 26 inch sham, cut one back panel 20 by 34 inches. Cut it in half lengthwise to create two pieces, each 20 by 17 inches. Hem one long edge of each with a one-half inch double-fold hem. This creates a 3-inch overlap when folded together.
Prepare the Front Panel
This is where design and structure begin. Add quilting, batting, or trim before assembly.
Add Batting for Body
Cut fusible fleece or batting 1 inch smaller than the finished pillow size. For a 20 by 26 inch insert, cut batting 19 by 25 inches. Iron it to the wrong side of the front fabric. This prevents floppy corners and adds weight, helping the sham lie flat. Use spray adhesive for non-fusible batting.
Quilt the Front (Optional)
Create a quilt sandwich by layering backing wrong side down, then batting, then front fabric right side up. Baste layers with safety pins or spray adhesive. Quilt in straight lines one-half inch apart, or create a diagonal grid for modern texture. Trim excess batting flush with the front panel when finished.
Attach Trim or Ruffles
For ruffles, cut a strip 2.5 times the perimeter. For a 20 by 26 inch sham, that is approximately 120 inches. Gather using long basting stitches, then pin in quarters to the front panel, right sides together. Sew with a one-half inch seam. For piping or lace, sew it between the front and backing during assembly.
Sew the Envelope Back Closure
This step creates the hidden opening. Accuracy ensures a clean, functional closure.
Hem the Back Panels
Take both back pieces and hem one long edge of each. Fold one-fourth inch, press, then fold another one-fourth inch and press again. Topstitch close to the inner fold. Use a fine needle and short stitch to prevent puckering. Spray hem with starch before folding to keep edges crisp.
Align Panels for Overlap
Place the front panel right side up. Lay the first back panel right side down, raw edges aligned, with the hemmed edge facing center. Place the second back panel on top, overlapping the first by 6 to 8 inches. Pin or clip all layers, especially at the overlap.
Assemble the Sham
Now bring it all together with clean, secure stitching.
Sew Around the Perimeter
Use a one-half inch seam allowance. Start at the center of the bottom edge to hide backstitching. Sew all four sides, backstitching at start and end. Keep stitches consistent and use a walking foot for thick fabrics.
Trim Corners and Finish Edges
Clip each corner diagonally to reduce bulk. Do not cut the stitches. Then zigzag the raw edges or serge for durability. This prevents fraying and helps corners turn out sharply.
Turn and Press
Reach through the envelope opening and pull the sham right side out. Use a chopstick or point turner to push out corners gently. Press the entire sham flat, folding seam allowances inward at the opening. Iron thoroughly because a crisp press makes a handmade sham look professional.
Add a Flange (Optional)
Even if you did not cut extra for a flange, you can create one after assembly.
Topstitch for a Clean Border
Measure 2 inches from the outer edge all around. Mark with a chalk roller or disappearing pen. Sew along the line, pivoting at corners by dropping the needle, lifting the presser foot, rotating the fabric, and lowering the foot to continue. Press the seam flat. The flange should stand slightly proud of the surface for a tailored effect.
Use a Wide Seam Allowance
Alternative method: After assembly, resew the entire perimeter with a 3-inch seam allowance. Press the seam flat to create a built-in flange without extra fabric.
Fit, Style, and Maintain
Now make it last and look great.
Insert Pillow Correctly
Open the envelope back and slide in the pillow slowly, pushing corners fully into place. Fluff to fill evenly. Fold back flaps neatly, one over the other, so the opening is hidden. Pair flanged shams with a matching duvet cover for a coordinated bed.
Wash and Care for Long Life
Remove the insert before washing. Machine wash cold on gentle cycle. Tumble dry low or air dry. Iron on the appropriate setting, testing on scrap fabric first. Zippered shams can be removed and washed more frequently.
Prevent Common Issues
Watch for these common problems and fixes. Corners not square means trim seam allowance before turning and press carefully. Bulk at seams requires grading thick layers or using bias binding. Hem puckering is fixed with starch, a fine needle, and shorter stitch. Uneven flange means pin in place before stitching and use a machine guide.
Customize for Any Decor
Make shams that reflect your style and space.
Match Room Themes
Kids’ rooms benefit from fun prints in durable cotton. Modern minimalist spaces call for solid colors with a 1-inch flange and clean lines. Southwest style uses earth tones, geometric weaves, or tapestry fabric. Vintage looks come from repurposed sheets, curtains, or tablecloths.
Use Fabric Scraps
Leftovers can become accent strips on the front, back panel inserts, or coordinating pillowcases. Make seasonal swaps using zippered shams to rotate decor throughout the year.
Save Money and Reduce Waste
DIY shams cost a fraction of retail and help you reuse fabric.
Cost Comparison
Two DIY shams cost approximately $8 to $12 in materials, compared to $50 to $120 retail. Materials like fabric and batting run $15 to $25 total. Vintage fabric from thrift stores costs just $2 to $5. You can make two king shams from one 56-inch-wide curtain panel.
Sustainability Benefits
Repurposing old textiles instead of buying new reduces packaging and shipping waste. This extends the life of your favorite fabrics while giving your bedroom a fresh look.
Troubleshoot Like a Pro
Even experts face issues. Here is how to fix them fast.
Sham Too Tight or Loose
Too tight means increase flange width or use a five-eighths inch seam allowance next time. Too loose means reduce seam allowance to a scant one-fourth inch or add a narrower flange.
Ruffle Uneven
Divide the ruffle and front panel into quarters. Pin at zero, 90, 180, and 270 degrees, then distribute gathers between those points.
Zipper Will Not Close
Use an invisible zipper foot and practice on scraps first. Align zipper teeth precisely with the seam line.
Fabric Shrinks After Wash
Always pre-wash fabric before cutting. This prevents distortion after laundering.
Final Tips for Success
Press every seam. It is the secret to a professional finish. Label all pieces to avoid mix-ups. Test fit the sham on the pillow before final pressing. Use quality thread because polyester resists breakage. Store flat or rolled to prevent creases in structured fabrics.
With these steps, you will create beautiful, custom pillow shams that elevate your bedroom decor, save money, and showcase your sewing skills. Whether making one for yourself or a dozen as gifts, this project delivers fast results with lasting impact.
Frequently Asked Questions About Sewing a Pillow Sham
What is the best fabric for a pillow sham?
Medium-weight cotton, decorator fabric, quilting cotton, or linen works best. Upholstery-grade fabrics like duck cloth, canvas, or velvet last longer and enhance flange structure. Avoid stretchy knits unless stabilized with interfacing.
How much smaller should a pillow sham be than the insert?
The finished sham should be 1 inch smaller than the pillow insert. This creates a snug, full appearance when stuffed. For example, a 20 by 26 inch pillow needs a 19 by 25 inch sham.
Can I make a pillow sham without a zipper?
Yes. The envelope back method uses overlapping panels to hide the opening. No zipper or buttons required. This is the easiest method for beginners and allows easy pillow insertion and removal.
How do I add a flange to my pillow sham?
Cut the front panel 4 inches larger than the pillow in both dimensions. After assembling the sham, measure 2 inches from the edge, mark all around, and topstitch along the line. Press the seam flat for a clean border.
How do I care for my handmade pillow sham?
Remove the insert before washing. Machine wash cold on gentle cycle. Tumble dry low or air dry. Iron on the appropriate setting for your fabric type. Store flat or rolled to prevent creases.
Key Takeaways for Sewing Your Own Pillow Shams
Sewing a pillow sham is a beginner-friendly project that costs significantly less than retail while offering complete creative control. The envelope back method is easiest for beginners, requiring no zippers or special feet. Always measure your actual pillow insert and cut the sham 1 inch smaller for a snug, polished fit. Press every seam thoroughly because this single step transforms a homemade project into a professional-looking result. With basic supplies and about an hour of time, you can create custom shams that elevate any bedroom decor.