
Nothing transforms a bedroom faster than custom Euro pillow shams with crisp lines and tailored edges. If you have ever wanted to create designer-quality shams without the boutique price tag, this guide shows you exactly how to make a Euro pillow sham that looks professionally made. You will learn fabric selection, precise cutting dimensions, three professional closure methods, and expert finishing techniques that ensure your handmade shams hold their shape and elevate your bedroom decor.
We will cover material preparation, accurate cutting, envelope back versus zipper installation, flanged edge creation, and troubleshooting tips. Whether you are a beginner with basic sewing skills or an experienced crafter aiming for luxury finishes, these step-by-step instructions deliver results you can be proud of.
Choose the Right Fabric for Your Euro Sham
Select a Durable Material
The fabric you choose determines how your sham drapes, holds structure, and ages. Premium options include linen, cotton sateen, and tightly woven cotton. These fabrics accept topstitching cleanly and maintain their shape over time.
For a budget-friendly luxury option, upcycle a king-size fitted sheet. Remove all elastic edges and press flat to reveal yards of coordinated fabric with built-in texture or sheen.
Use matching, contrasting, or neutral fabric for the back. If making an envelope-style sham, ensure the back fabric provides at least 20 inches of overlap after seam allowance.
Pre-Wash and Press Fabric
Always pre-wash natural fibers like cotton or linen to prevent shrinkage after construction. Tumble dry and press thoroughly before cutting. A flat, wrinkle-free surface ensures accurate measurements and clean seams.
Pro Tip: Iron-on interfacing adds body to lightweight fabrics and is essential when making flanged shams that need structure.
Cut Fabric to Exact Dimensions

Basic Sham Without Flange
For a standard 26-inch by 26-inch Euro pillow insert, cut your fabric to these dimensions.
Face panel: 27 inches by 27 inches (adds half-inch seam allowance per side)
Two back panels: 27 inches by 20 inches each
For 28-inch inserts, add 2 inches to all dimensions.
Use a rotary cutter, self-healing mat, and clear ruler for precision. Mark cutting lines with fabric chalk or a washable marker. Align the fabric grain to ensure the sham lies flat and drapes evenly.
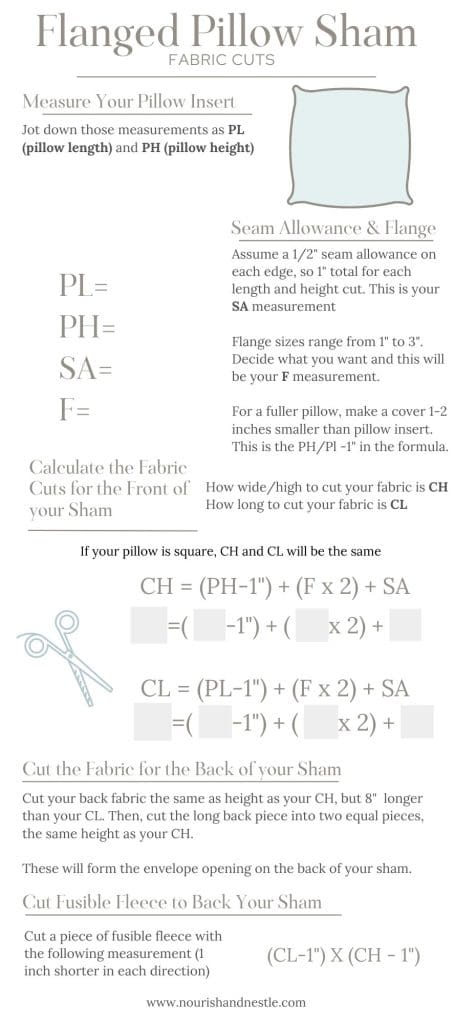
Flanged Sham Dimensions
To create a flanged edge, the face fabric must extend beyond the pillow size.
Face panel: 32.25 inches by 32.25 inches (26-inch pillow plus 1.25-inch seam allowance plus 2.5-inch flange multiplied by 2)
Two back panels: 32.25 inches by 20 inches each
The back remains unflanged. The flange forms only on the front and wraps around the edge.
Design Note: A 1.5-inch flange gives a sharper, more structured look. A 2.5-inch flange appears fuller but may flop without support. Add iron-on interfacing or buckram to the wrong side of the face fabric for stiffness.
Create an Envelope Back Closure
Hem the Back Panels
Cut one piece of back fabric to 27 inches by 40 inches, then cut it in half to create two 27-inch by 20-inch panels. On one long edge of each piece, fold half an inch toward the wrong side and press. Fold again half an inch and press to encase the raw edge. Pin and sew along the inner folded edge with a quarter-inch seam for a clean, double-fold hem.
The hemmed edges will face each other in the center, creating an overlapping closure.
Assemble the Sham
Place the face fabric right side up on your work surface. Position one back panel right side down on top, aligning the top, left, and right raw edges. The hemmed edge should point toward the center. Place the second back panel on the opposite side, also right side down, with its hemmed edge overlapping the first in the middle.
Pin all four sides securely. Use clips if working with slippery fabric to prevent shifting.
Sew and Finish
Stitch around the entire perimeter using a quarter-inch to five-eighths-inch seam allowance. Trim all four corners at a 45-degree angle to reduce bulk. Turn the sham right side out through the envelope opening. Use a chopstick or blunt tool to push out the corners gently. Press all edges with a hot iron for a crisp finish.
Avoid This Mistake: Do not over-trim corners as this can cause fabric to split during turning.
Install an Invisible Zipper
Prepare Panels and Zipper
Cut two face panels to 27 inches by 27 inches. Place them right sides together along one top edge. Mark 4 inches in from each end. This leaves a 20-inch zone for the zipper. Baste with a long stitch between the marks to hold layers together temporarily.
Use a 20 to 21-inch invisible zipper. Longer than the opening ensures full coverage. Open the zipper halfway before attaching.
Attach the Zipper
Pin the closed side of the zipper tape to one basted edge, right sides together. Use the zipper foot on your machine to sew as close to the teeth as possible. Flip the fabric, align the other panel to the opposite side of the zipper, and sew in place.
Pro Tip: Leave the needle down when the zipper pull reaches it. This keeps the fabric aligned as you pivot.
Complete the Seam
Carefully unpick the basting stitches along the seam. With the zipper still open, pin the remaining three sides, right sides together. Sew with a five-eighths-inch seam allowance, stopping five-eighths inch short at both ends of the zipper edge.
Turn the sham right side out through the zipper opening. Press seams flat. Close the zipper to check for smooth operation.
Secure the Ends: Apply fray check or a drop of fabric stabilizer to the zipper tape ends to prevent unraveling.
Add a Flanged Edge
Sew and Turn Before Flanging
After assembling the sham using either envelope or zipper method, do not turn it right side out yet. Sew with a five-eighths-inch seam allowance, trim corners, then turn right side out and press.
Topstitch the Flange
Use painter’s tape to mark a line 2.5 inches from the outer edge on your sewing machine bed. This acts as a guide. With the sham right side up, topstitch through all layers 2.5 inches from the edge, encasing the seam and forming the flange.
Key Tip: This stitch secures the flange and gives it a clean, rolled appearance. Backstitch at corners for strength.
For a stiffer flange, fuse iron-on interfacing or a strip of buckram (cut 3 inches wide) to the wrong side of the face fabric before assembly.
Finish Seams for Durability
Choose a Seam Finish Method
Raw fabric edges can fray over time. Prevent this with one of these finishes.
Zig-zag stitch: Sew along raw edges before assembly.
French seam: Encase raw edges inside a double seam. Ideal for sheer or lightweight fabrics.
Serger: Trim and overlock edges in one pass for a clean, stretchable finish.
Overlock stitch: Use if your machine has a built-in overedge function.
Expert Note: Even without a serger, a zig-zag or French seam gives a professional result.
Topstitch for Strength and Style
Topstitch around the entire perimeter quarter-inch to half-inch from the edge. Use matching thread and a straight stitch. Backstitch at corners and direction changes to lock stitches.
This adds durability and gives the sham a tailored, high-end look.
Insert the Pillow Correctly
Use the Right Technique
For envelope backs: Slide the pillow in from the center overlap. Grasp the back panels and feed gently. Do not pull on the seams.
For zipper shams: Always open the zipper before inserting the pillow. Feed from the center and smooth the fabric outward. Avoid forcing. If it is tight, check your seam allowance.
Warning: Forcing the insert can stress the zipper or split seams.
Style Like a Pro
Layer on a King-Size Bed
Create depth with this sequence.
Smooth duvet and fold top sheet over 6 inches.
Place sleeping pillows against the headboard.
Add three Euro shams in a straight back row.
Layer two square pillows and one bolster in front.
This mimics luxury hotel styling and adds symmetry.
Color Tip: Use Euro shams in a solid that complements patterned accent pillows.
Troubleshoot Common Issues
Fix Flange Flop
If your flange bends over instead of standing crisp, try these solutions.
Add iron-on interfacing or buckram to the back of the face fabric.
Opt for a 1.5-inch flange. It is more structured than 2.5 inches.
Use a heavier fabric like linen or sateen.
Prevent Gaping Envelope Backs
If the back gaps open, consider these fixes.
Use a heavier fabric.
Increase overlap by making back panels 22 inches long instead of 20 inches.
Add a snap or button closure at the center.
Avoid Uneven Edges
Ensure consistent seam allowance by using these techniques.
Use painter’s tape on the machine bed as a guide.
Check seam width every few inches.
Pin or clip layers to prevent shift.
Frequently Asked Questions About Making Euro Pillow Shams
What size Euro pillow sham do I need?
Standard Euro pillow shams measure 26 inches by 26 inches to fit standard Euro pillow inserts. Some manufacturers offer 28-inch by 28-inch options. Always measure your insert and add half-inch seam allowance on each side when cutting fabric.
Which closure method is easiest for beginners?
The envelope back closure is the easiest method for beginners. It requires no special feet or zippers, is forgiving of slight measurement errors, and allows easy removal for washing. The back panels simply overlap in the center, creating a clean finish without hardware.
How do I prevent my flange from flopping?
Prevent flange flop by adding iron-on interfacing or buckram to the wrong side of the face fabric before assembly. Choose a 1.5-inch flange instead of 2.5 inches for a crisper structure. Use heavier fabrics like linen or cotton sateen rather than lightweight materials.
Can I make a Euro sham without a sewing machine?
While possible, hand-sewing a Euro sham is extremely time-consuming and produces less durable results. A basic sewing machine with straight stitch capability is essential for professional-looking results. Budget-friendly machines handle envelope back closures adequately.
How much does it cost to make a Euro pillow sham?
DIY Euro shams cost 30 to 60 percent less than retail versions. Using an upcycled king-size fitted sheet can yield up to three Euro shams, dramatically reducing material costs. Beginner projects take approximately 60 minutes, while advanced shams with flanges and zippers take 90 minutes or more.
Key Takeaways for Making Euro Pillow Shams
Creating beautiful Euro pillow shams comes down to three core elements: precise cutting, appropriate fabric choice, and careful finishing. Start with a standard envelope back closure if you are a beginner. This method delivers clean results without special equipment. Choose heavier fabrics like linen or cotton sateen for better structure and drape.
Invest time in pressing. Iron every seam as you work. This single habit separates homemade projects from professional-looking results. Add interfacing to flanged edges and backstitch at corners for durability.
With practice, you can complete a pair of Euro shams in under 1.5 hours while saving 30 to 60 percent compared to retail prices. Your handmade shams will not just match your decor. They will elevate it.