
Tired of paying premium prices for Euro pillowcases that never quite match your bedding? Making your own Euro pillowcase at home gives you complete control over fabric, fit, and style while saving significant money. This step-by-step guide covers everything you need to know about how to make a euro pillow case, from selecting the right fabric to finishing with professional-grade closures. Whether you prefer a simple envelope back, classic buttons, or a sleek zipper, you’ll find clear instructions to create a polished sham in under two hours.
Measure Your Euro Pillow First
Before purchasing fabric or making any cuts, measure your actual Euro pillow to ensure a proper fit. Standard sizes vary more than most people realize, and guessing can result in a pillowcase that’s too tight or too loose.
Why Precise Measurements Matter
Pillows compress over time, and different fill types affect dimensions significantly. Down-filled pillows expand differently than polyester-filled ones, and brand-new pillows often differ from well-used ones. Pre-washing fabric causes shrinkage, so accounting for this upfront prevents a too-small final product.
Standard Euro Pillow Dimensions
The most common Euro pillow sizes include 26×26 inches for standard beds and 28×28 inches for larger or plush pillows. European sizes vary as well, with 65×65 cm and 80×80 cm frequently used abroad. Always measure your specific pillow rather than relying solely on标签ed sizes.
Calculating Your Cut Size
Add one-half inch seam allowance on all sides when cutting fabric. For a 26-inch pillow, cut a 27×27-inch square for a snug fit. For a looser drape, add one full inch per side instead.
Choose the Right Fabric for Your Project
Selecting appropriate fabric determines both the look and durability of your finished pillowcase. Different use cases call for different material weights and textures.
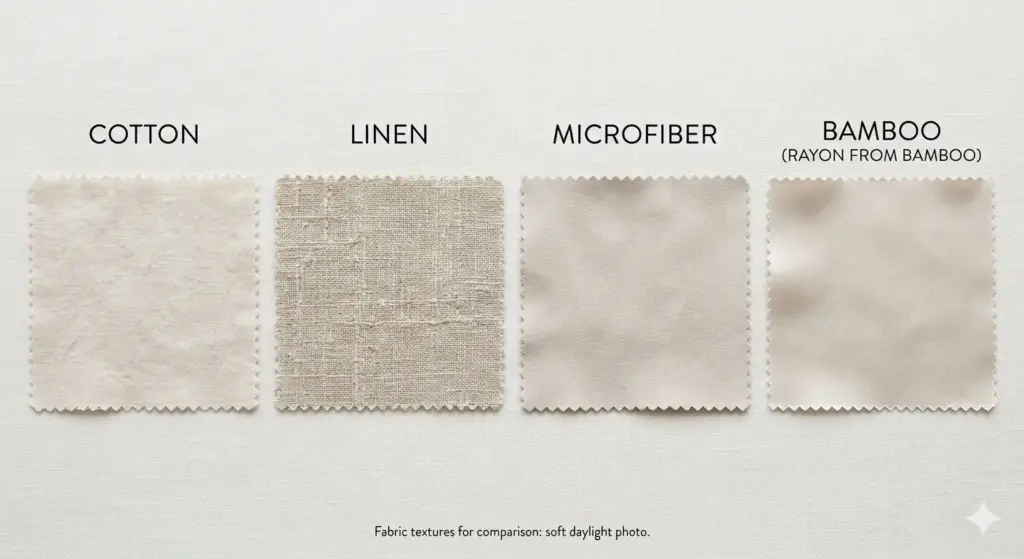
Best Fabrics for Sleep Use
Cotton offers breathability and easy care, making it ideal for everyday sleeping pillows. Linen provides natural texture and moisture-wicking properties that improve with age. European laundered linen delivers premium drape and exceptional durability for luxury bedding. Cotton-synthetic blends resist wrinkles and maintain their shape through repeated washing.
Best Fabrics for Decorative Use
Drapery fabric works beautifully for structured, flanged shams that stand upright. Tweed and brushed denim add rustic charm and stand up to frequent handling. Quilted fabric brings thickness and warmth to layered beds. Gingham, plaid, and floral prints suit seasonal decorating and cottage-inspired styles.
Critical Fabric Preparation Steps
Always pre-wash your fabric before cutting to eliminate shrinkage that would distort your finished pillowcase. Avoid fusible bonding for projects that will be washed frequently, as the adhesive breaks down over time.
Select Your Preferred Closure Type
The closure you choose affects both the appearance and functionality of your Euro pillowcase. Three main options suit different skill levels and aesthetic preferences.
Envelope Closure Method
The envelope closure features two overlapping back flaps that create a clean, seamless appearance. This beginner-friendly method requires no special hardware and allows easy pillow insertion and removal.
Cut sizes for a 26-inch pillow:
– Front panel: 27×27 inches (including seam allowance)
– Back flaps: Two pieces at 15×27 inches each
To finish the flaps, fold one long edge of each back piece toward the wrong side by one-half inch, press flat, then fold again another one-half inch to encase the raw edge. Sew along the inner fold to secure.
Button Closure Method
Button closures add a decorative, traditional element perfect for vintage-inspired or heirloom-quality designs. This method requires more time but creates a distinctive look.
Create button bands by folding each closure edge two times, folding two centimeters toward the wrong side each time, then topstitching close to both folded edges. Space buttons fifteen to twenty-five centimeters apart for secure closure. Apply fusible interfacing behind buttonhole areas before sewing to prevent tearing.
Zipper Closure Method
Zipper closures provide a sleek, modern finish ideal for silk, velvet, or high-end fabrics. This method offers the most durability and allows full opening for easy pillow insertion.
Use a zipper foot to install the zipper with right sides together, stitching close to the teeth. Finish both closure edges with overlock or zigzag stitch before pressing and attaching the zipper.
Add a Flange for Elegant Definition

A flange is a decorative border that extends beyond the seam line, adding polish and visual interest to your pillowcase.
Recommended Flange Widths
A one-and-a-half-inch flange stands upright nicely for modern decor. A two-and-a-half-inch flange creates softer draping suitable for traditional styles. Anything wider tends to flop unless reinforced with interfacing.
How to Create a Defined Flange
Apply iron-on interfacing to the back of your front panel along all four edges before assembly. After turning the pillowcase right side out, measure your desired flange width from the outer edge and stitch all the way around through both layers to secure it in place.
Cut and Finish Edges Properly
Clean edges prevent fraying and ensure your pillowcase maintains its professional appearance through multiple washings.
Edge Finishing Options
Overlock or serged edges provide the most durable finish for all fabric types. Zigzag stitching offers a good substitute when a serger isn’t available. Bias binding works well for decorative fabrics prone to fraying or for adding visual contrast.
Folding Technique for Clean Seams
Fold each edge one-half inch twice to hide raw edges completely. Use fabric clips instead of pins when working with thick materials to avoid inaccurate measurements. Baste thick or slippery fabrics before final sewing to prevent shifting.
Assemble Your Euro Pillowcase
Follow these steps to bring all pieces together into a finished pillowcase.
Layer the Components
Place your front panel right side up on a flat surface. Position the first back flap on top, right side down, aligning the three raw edges. The hemmed edge should face toward the center of the pillow. Place the second back flap on the opposite side, overlapping the first flap in the center for complete coverage.
Pin and Sew Around the Perimeter
Pin pieces together every two inches around all four outer edges. Avoid pinning across the overlapping center seam. Sew with a one-quarter inch seam allowance, backstitching at the beginning and end for durability. At corners, stop with the needle down, lift the presser foot, rotate the fabric, and continue sewing.
Turn and Press for a Crisp Finish
Trim excess threads and clip corner seams to reduce bulk. Turn the pillowcase right side out and use a chopstick or knitting needle to push out corners completely. Press with an iron to create sharp edges.
Test the Fit and Adjust
Slide your Euro pillow into the finished case and check the fit. The pillow should slide in easily but fit snugly enough to avoid slipping. If the case feels too tight, increase your cut sizes by one-half inch per side for future projects. If it’s too loose, trim slightly or add a smaller seam allowance.
Customize Your Design
Once you master the basic Euro pillowcase, experiment with these creative variations.
Design Options to Try
Create a ruffled edge by gathering a long fabric strip and attaching it to the front panel before assembly. Make a reversible sham using two different fabrics and assembling with right sides together. Add a quilted top by layering front fabric with batting and backing, then quilting in your preferred pattern. Sew a small interior pocket for storing a remote or glasses using contrasting fabric for visual interest.
Troubleshoot Common Problems
Even experienced sewers encounter occasional issues. Here’s how to fix the most frequent problems.
| Problem | Solution |
|---|---|
| Pillowcase too tight | Pre-wash fabric and add one-half inch seam allowance |
| Back flaps don’t overlap | Ensure each flap equals half the pillow width plus two inches |
| Zipper won’t close properly | Baste zipper first and use a zipper foot for alignment |
| Buttonholes tear | Apply fusible interfacing before sewing buttonholes |
| Corners not sharp | Use a blunt tool to fully push out corners before pressing |
| Edges fray after washing | Finish all seams with serger, zigzag, or bias binding |
Maintain Your Handmade Pillowcase
Proper care extends the life of your DIY Euro pillowcase significantly.
Washing Guidelines
Machine wash in cold water on a gentle cycle using mild detergent. Tumble dry on low heat or line dry to protect seams. Avoid bleach, which breaks down fabric fibers and causes discoloration.
Extending Durability
Reinforce corners with bar tacks or double stitching to prevent stress tears. Replace pillowcases every one to two years with regular use. Repair frayed seams promptly before they worsen.
Frequently Asked Questions About Making Euro Pillowcases
What is the standard size for a Euro pillowcase?
The standard Euro pillow measures 26×26 inches, though 28×28 inches is also common. Always measure your specific pillow before cutting fabric, as sizes vary by brand and fill type.
How much fabric do I need to make one Euro pillowcase?
One yard of fabric (approximately 0.91 meters) typically suffices for a single Euro pillowcase. Purchasing slightly more allows for pattern matching or potential mistakes.
Which closure type is easiest for beginners?
The envelope closure is the easiest method for beginners. It requires no special hardware, hides all seams, and allows easy pillow insertion and removal.
Can I make a Euro pillowcase without a sewing machine?
While possible, hand-sewing a quality pillowcase takes significantly longer. A sewing machine produces more durable, professional-looking results with consistent stitch length.
How do I prevent my fabric from shrinking after washing?
Always pre-wash fabric before cutting to remove manufacturing finishes and allow for initial shrinkage. Use cold water and mild detergent, then tumble dry on low heat.
What thread should I use for making pillowcases?
Use all-purpose polyester thread in a color matching your fabric. Polyester provides strength and some stretch, accommodating fabric movement during washing better than cotton thread.
Key Takeaways for Making Euro Pillowcases
Creating professional-quality Euro pillowcases at home is entirely achievable with basic sewing skills and the right guidance. The most critical steps involve measuring your actual pillow before cutting, selecting appropriate fabric for your intended use, and choosing a closure method that matches your skill level and aesthetic preferences. Pre-washing fabric prevents post-construction shrinkage, while consistent seam allowances and backstitching ensure durability through repeated washing. Whether you create simple envelope-back shams for everyday use or elaborate button-closed designs for decorative layering, your handmade pillowcases will provide custom fit and style that store-bought options rarely match. Start with one pillowcase, perfect your technique, and you’ll have a complete set of coordinated bedding in no time.