

Tired of flat, lifeless throw pillows? A round pillow with piping elevates your décor with clean lines, professional flair, and custom charm. Whether you’re crafting a plush floor cushion, a tufted accent, or a sturdy stool pad, adding piping around the edge gives your handmade pillow a tailored, high-end finish. This guide walks you through two proven methods, each with precise steps, material specs, and pro tips to ensure success.
From bias-cut piping to seamless joins and hidden closures, you will learn exactly how to sew a round pillow with piping that looks store-bought but carries your personal touch. We cover fabric choices, cutting math, closure options, and troubleshooting common pitfalls like puckered seams or broken drawstrings.
Cut Fabric for Your Round Pillow
Determine Pillow Size and Shape
Start by choosing your desired diameter. Standard sizes include 12, 14, 15, or 18 inches. Use a compass, plate, or template to draw a perfect circle on your fabric. Cut two identical circles for the front and back panels.
To ensure symmetry, place fabric on the fold and cut once. Always use a 1/2-inch seam allowance in your planning. This approach minimizes fabric waste while guaranteeing matching pieces.
Calculate Side Panel Dimensions
For a boxed-style pillow, cut a rectangular strip for the side panel. The height equals pillow depth, typically 2 to 4 inches. The length equals pi multiplied by diameter plus 2 inches for seam allowance.
For example, a 15-inch pillow requires approximately 47 inches plus 2 inches, totaling 49 inches long by 4 inches high. Cut two strips if joining lengthwise, then sew with a 1/4-inch seam using a zipper foot for precision.
Prepare Bias Strips for Piping
Piping must be cut on the bias grain, 45 degrees to the selvage, for flexibility around curves. Cut 1.5-inch wide strips from your main or contrast fabric. You need total length equal to twice the circumference.
For a 15-inch pillow, that is approximately 94 inches. Join strips diagonally by placing them at right angles and stitching corner to corner. Trim to 1/4-inch and press open. This technique prevents bulk and allows smooth bending around your round pillow.
Choose Fabric and Add Interfacing
Match Fabric to Pillow Style
Select fabric based on your desired pillow aesthetic. Quilting cotton works best for gathered or pleated designs. Pre-wash to avoid shrinkage. Velvet or silk is ideal for tufted, no-pleat pillows. Avoid using velvet for gathers because it creates too much bulk.
Medium-weight decor fabric offers durability for floor cushions or stool pads. Linen provides a structured, modern look but wrinkles easily, so press frequently during construction.
Apply Fusible Interfacing
Apply fusible interfacing to the wrong sides of all panels for stability. Use Pellon Shape-Flex SF101 or similar lightweight fusible. For the side panel, add a 3-inch by 44-inch strip of fusible batting to the wrong side.
This reduces seam visibility and adds body to your pillow. Skipping interfacing results in floppy edges and visible stitching lines on the finished piece.
Make and Attach Piping to Circles
Create Piping with Cording
Use 1/4-inch cotton or polyester cording because it holds shape without flattening. Place cording centered on the wrong side of your bias strip. Fold fabric over to enclose the cord. Use a zipper foot to stitch as close to the cord as possible.
Pro tip: Shift your needle left if your machine allows to tighten the seam. Make two separate piping lengths, one for the front and one for the back panel.
Attach Piping to Front Panel
Mark your starting point on the edge of the front circle. Begin stitching 1 inch from the start, leaving a 1-inch tail of unstitched piping. Backstitch at the mark to secure. Sew with a 1/2-inch seam allowance, easing bias around the curve.
Stop 2 inches before completing the circle. Do not join ends yet. Repeat the process for the back panel, especially if using a closure like Velcro.
Join Piping Ends Seamlessly
Stop 2 inches from your start point. Trim the cording, leaving 1/2-inch beyond the fabric. Cut the end at a 45-degree angle to reduce bulk. Butt fabric ends together with no overlap and no gap. Baste ends securely before resuming sewing.
This technique creates a smooth, invisible join that looks professional. Avoid using glue by applying fabric glue to the piping lip and pressing to the wrong side of the circle. This prevents shifting during assembly.
Assemble the Boxed Round Pillow

Build Back Panel with Closure
For removable inserts, split the back into two semi-circles. Cut one piece with a 1-inch extension on the straight edge. Apply facing by folding the edge 1/2-inch, pressing, and topstitching at 1/4-inch and 1/8-inch.
Attach 4 to 6 inches of Velcro. Place the hook (rough) side on the wrong side of the top piece. Place the loop (soft) side on the right side of the bottom piece. Overlap and baste closed, ensuring the diameter matches the front panel.
Alternative closure: Install an 8 to 10-inch invisible zipper vertically in the side panel.
Join Side Panel to Front and Back
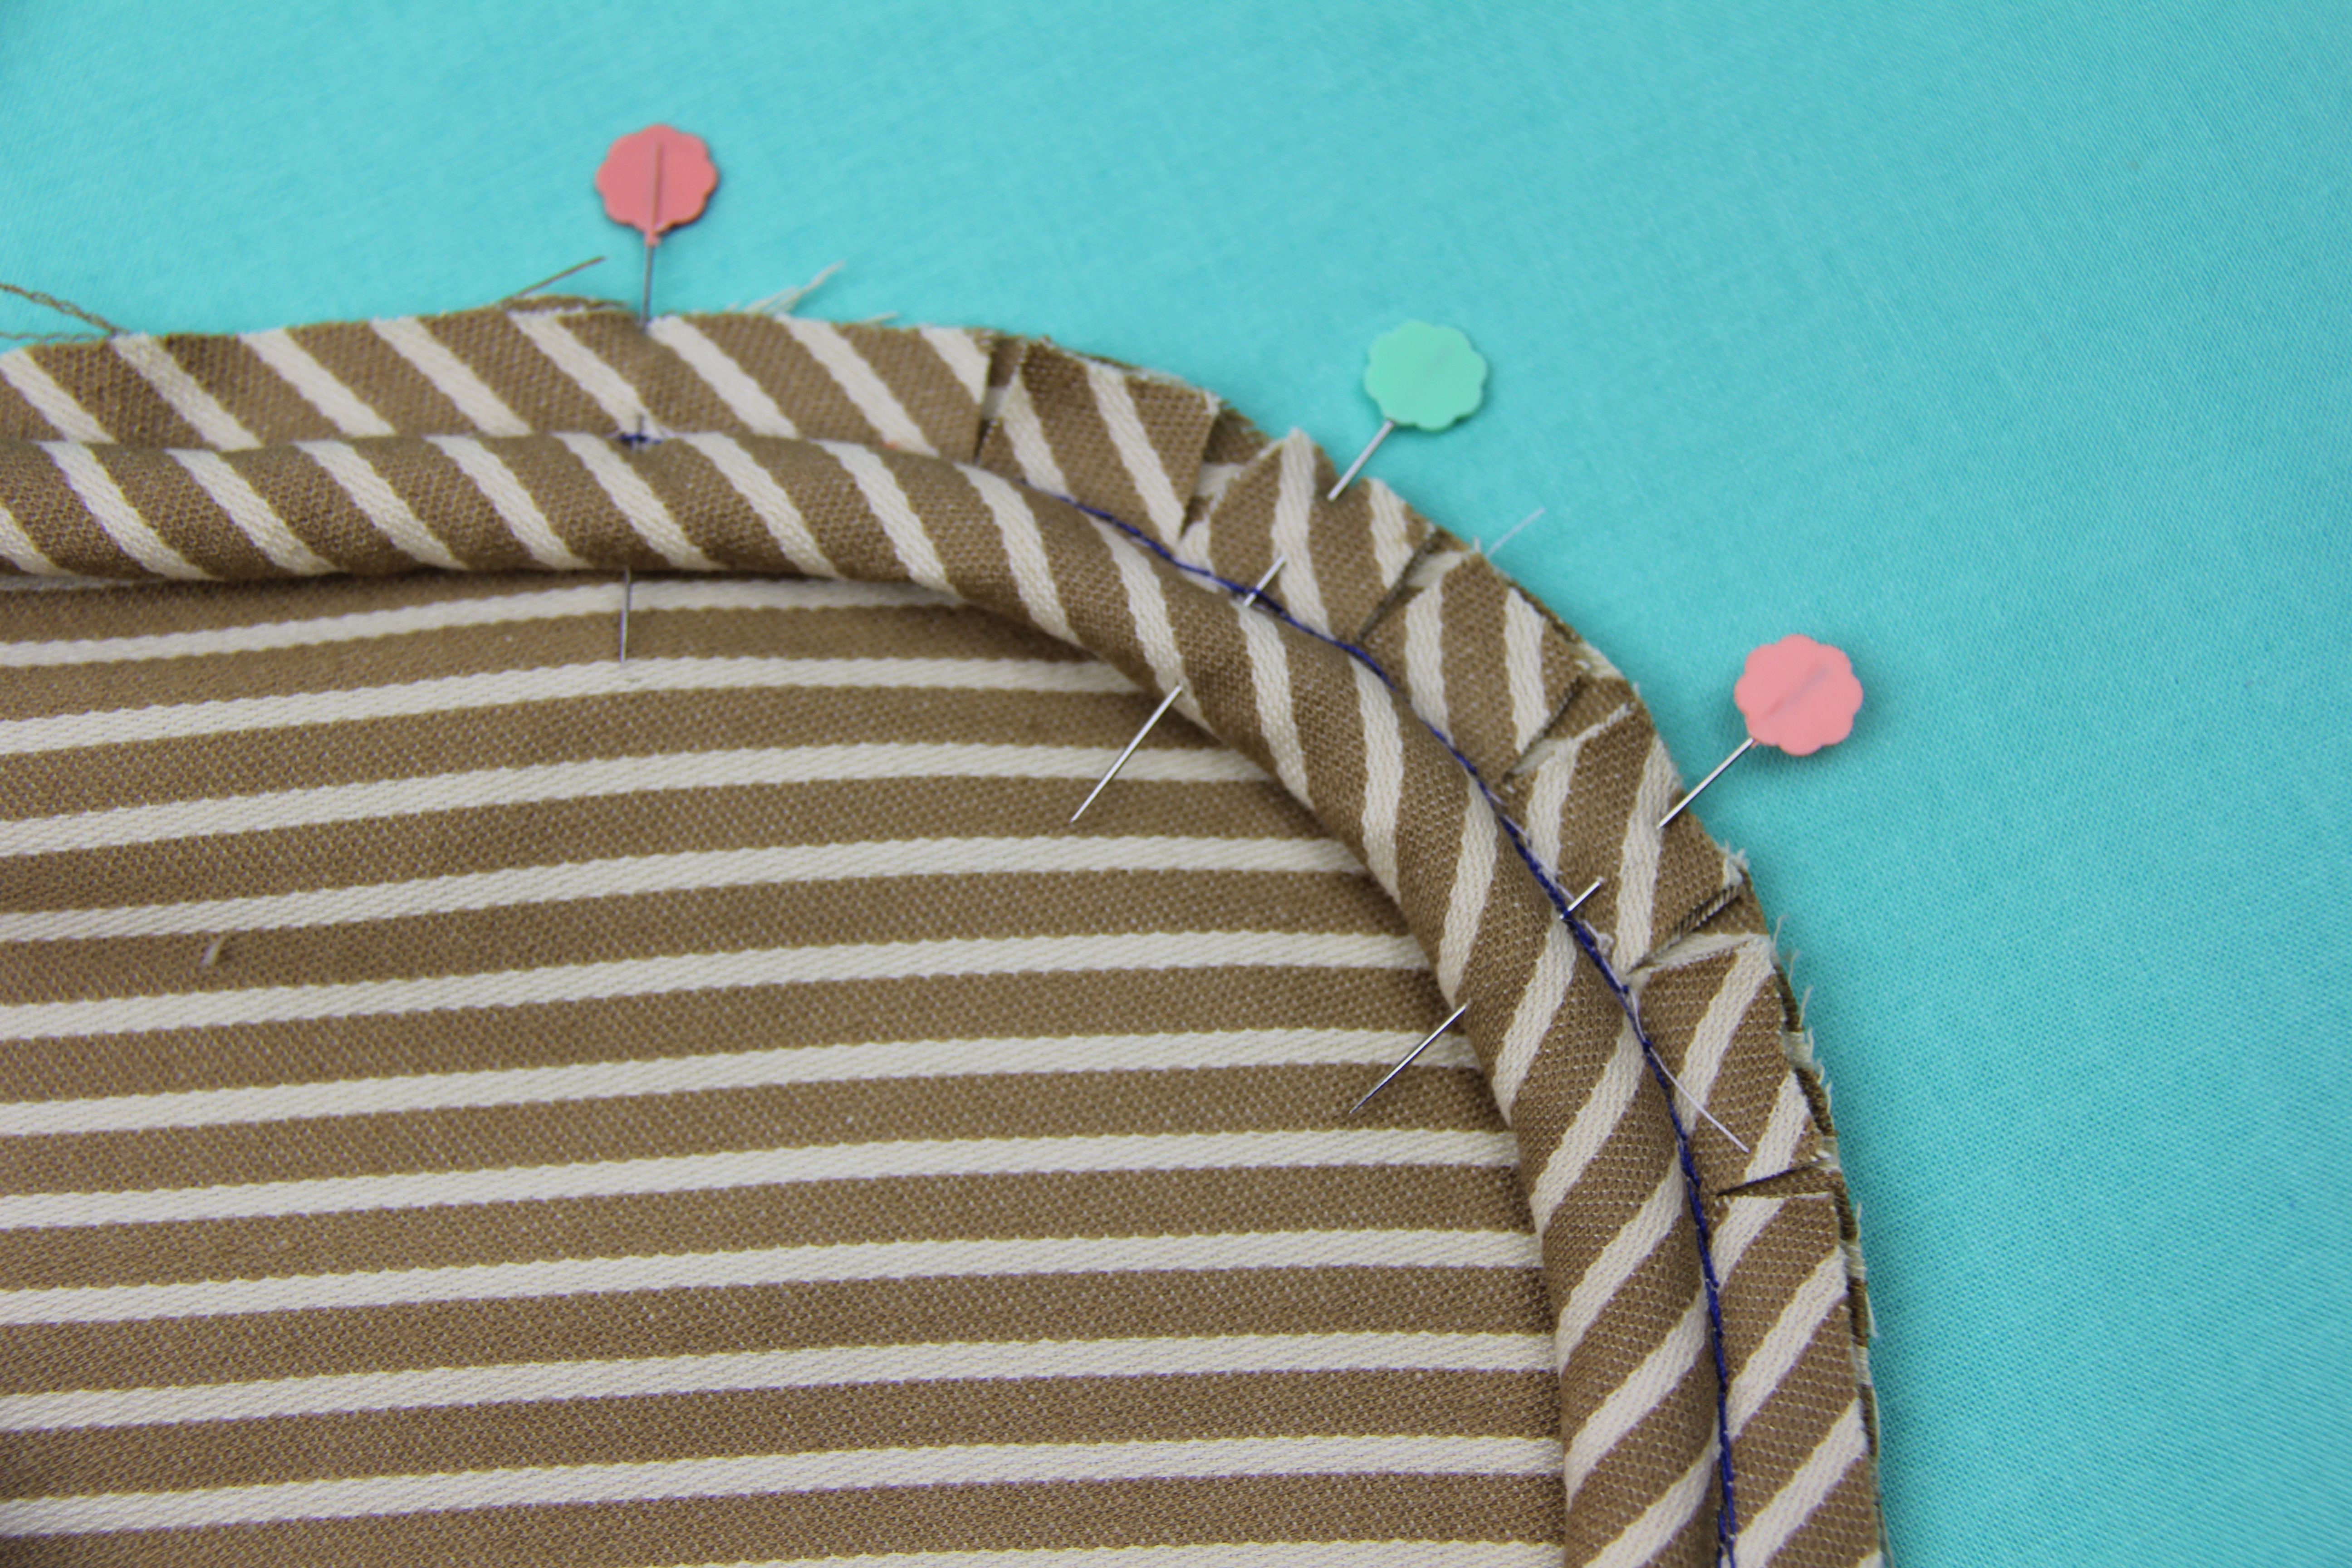
With right sides together, pin the raw edge of the side panel to the front circle. Sandwich the piping between layers. Pin every 2 to 3 inches, using clips on slippery fabrics.
Clip curves every 1 to 2 inches to reduce bulk, but never cut through the stitching. Using a zipper foot, sew with a 1/2-inch seam allowance, staying close to the cording. Backstitch at start and end.
Repeat to attach the side panel to the back panel.
Trim Seams and Turn Right Side Out
Grade seams by trimming one layer shorter than the other. Clip curves carefully to allow flat lying after turning. Turn right side out through the Velcro opening.
Use a chopstick to push out edges. Do not force the cording. Press gently with steam, avoiding direct heat on the cord.
Insert Pillow Form and Close
Choose the Right Insert
Select your insert based on desired firmness. Foam core uses Fairfield Nu-Foam, either one 3-inch disc or three 1-inch layers stacked. Polyester fill provides a softer feel. Stuff until plump but not overstuffed.
Down-feather blend (10/90) offers a luxurious, moldable option ideal for bed accents. For boxed pillows, use a knife-edge form 1 inch larger than the finished size. A 15-inch pillow with 2-inch depth requires an 18-inch insert.
Close with Hidden Velcro
Align Velcro strips with hook on top and loop on bottom. Press firmly to seal. Insert the form through the opening before final closure.
For a cleaner look, hand-stitch a ladder closure on a 3 to 4-inch opening. Pull tight for invisibility.
Sew a Gathered Round Pillow with Drawstring
Construct the Body Tube
Cut top and bottom panels measuring 7-3/4 inches by 44 inches. Cut the side panel at 4 inches by 44 inches. Attach the first piping to the top panel right side using a zipper foot and baste.
Place the side panel on top with right sides together, sandwiching the piping. Stitch the entire length and press the seam up. Repeat with the second piping and bottom panel.
Fuse a 3-inch by 44-inch strip of fusible batting to the wrong side of the side panel for stability.
Join Tube Ends and Create Casings
Fold the tube in half with right sides together. Match piping ends and sew the vertical seam with 1/2-inch allowance. Trim excess piping flush. Turn right side out and press lightly.
Form drawstring channels by folding top and bottom edges 1/2-inch down. Press. Edgestitch along the inner fold, leaving a small opening at the vertical seam. For fray-prone fabrics, double-fold before stitching.
Thread Drawstrings and Cinch
Cut two 36-inch lengths of heavy-duty thread, button thread, or yarn. Tie one end to a safety pin. Thread through each casing, starting from the opening. Feed completely around.
Never use all-purpose thread because it breaks under tension.
Stuff and Attach Buttons
Pull both ends of the bottom drawstring to gather tightly. Knot securely. Flip so the gathered end is down. Stuff with polyfill or down-feather blend until firm but soft.
Pull the top drawstring tight and knot. Now attach covered buttons. Use leftover fabric to cover jumbo buttons (1.5 inches or larger). Place lightweight batting scrap under fabric for a smooth curve.
Hand-sew one button to the front center and one to the back. Pull tight to enhance the tufted effect. Buttons must be perfectly centered to hide gather points.
Master Piping on Curves Like a Pro

Use the Right Foot and Tension
A zipper foot is essential for stitching tight against cording. Hold piping down with your non-dominant hand to prevent rolling. Apply gentle, consistent tension. Bias should stretch slightly but not distort.
Prevent Puckers and Gaps
Clip seam allowances every 1 to 2 inches before turning. Grade layers at seams to reduce bulk. Test on scraps first to practice curve sewing with piping.
If piping rolls during sewing, push it down with your finger as you work. Use clips on silky fabrics.
Choose the Best Closure Method
Select the right closure for your project. Velcro works best for boxed pillows with foam cores. It is hidden, functional, and washable. Attach hook to wrong side and loop to right side to prevent snagging.
Drawstring with button suits gathered, decorative pillows. It adds vintage charm but requires heavy-duty thread and jumbo buttons.
An invisible hand stitch (ladder closure) works when turning a 3 to 4-inch opening after stuffing. Use double thread and catch one stitch from each side.
A zipper in the side seam suits seat cushions needing frequent cleaning. Use an invisible zipper for a clean look.
Troubleshoot Common Sewing Problems
Piping rolling under is caused by wrong foot, low pressure, or no manual control. Use a zipper foot, push cord down with fingers, and pin densely.
Gaps at the piping join result from misaligned ends or over-trimming. Cut cording at 45 degrees, butt fabric ends tightly, and baste before final stitch.
Puckered seams on curves happen when using straight-grain piping or overstretching. Always use bias-cut strips, clip curves, and let the bias do the work.
Bulky seam allowance comes from too much fabric in tight curves. Grade seams, trim excess, and clip curves carefully.
Thread breaks during gathering because all-purpose thread is too weak. Use button, upholstery, or heavy-duty thread instead.
Buttons do not cover gather points when too small or off-center. Use 1.5-inch or larger buttons and mark center precisely.
Design Tips and Styling Ideas
Use Contrast or Coordinate Piping
Contrast piping creates a bold effect. Navy on cream or black on floral makes a statement. Coordinate piping by matching a secondary color in your print for subtle elegance.
Highlight Center Motifs and Mix Textures
Place striking prints or embroideries in the center of circles because no seams will disrupt the design. Pair a velvet round pillow with linen shams or knit throws for texture contrast.
Layer round pillows in front of square or lumbar pillows for depth.
Choose Size by Use Case
Twelve to 14-inch pillows suit kids seating or bed accents. Fifteen to 18-inch pillows work for floor cushions, neck support, or adult seating. Three-inch depth provides ideal firm support.
Frequently Asked Questions About Sewing a Round Pillow with Piping
What is the best fabric for a round pillow with piping?
Quilting cotton works well for gathered or pleated styles. Medium-weight decor fabric suits boxed floor cushions. Velvet is best for tufted, no-pleat designs. Always pre-wash fabric to prevent shrinkage.
Why must piping be cut on the bias?
Bias-cut fabric flexes and bends around curves without puckering. Straight-grain piping creates wavy, uneven seams when applied to round edges. The 45-degree angle allows natural stretching.
How do I prevent piping from rolling while sewing?
Use a zipper foot positioned close to the cording. Push the piping down with your fingers as you sew. Hold the fabric taut with your non-dominant hand and pin densely.
What thread should I use for drawstring gathering?
Never use all-purpose thread. Use heavy-duty thread, button thread, upholstery thread, or yarn. All-purpose thread breaks under the tension required to gather fabric.
How do I close a round pillow after inserting the form?
Use Velcro strips for removable inserts. Hand-stitch a ladder closure for invisible seams. For gathered pillows, pull drawstrings tight and knot securely before attaching covered buttons.
What size insert should I use for a boxed round pillow?
Use a knife-edge form 1 inch larger than the finished size. A 15-inch pillow with 2-inch boxing needs an 18-inch insert. This ensures a plump, professional appearance.
Key Takeaways for Sewing Round Pillows with Piping
A round pillow with piping is a statement piece that elevates any room. With the right materials, bias-cut piping, and a zipper foot, you can create a custom piece rivaling high-end décor. Whether you choose the boxed method for a structured look or the gathered style for a tufted vintage vibe, attention to detail makes all the difference.
Remember that bias-cut piping is non-negotiable for smooth curves. Always use heavy-duty thread for drawstring gathering. Practice on scrap fabric before your final project. Grade seams and clip curves to prevent bulk and puckering.
Now that you know how to sew a round pillow with piping the right way, you are ready to customize colors, textures, and sizes for any room. Your handmade pillow will last for years while looking anything but DIY.