
Adding braided cording to a pillow instantly elevates its look, giving it a custom, high-end finish that mimics professional upholstery. Whether you’re working with pre-made flanged cording, hand-braided yarn trim, or twist cord with fabric tape, the key to success lies in precise attachment and a seamless join. This guide walks you through every step, from measuring and prep to stitching and finishing, so your decorative pillows look polished, durable, and gallery-worthy.
You’ll learn how to attach cording smoothly along edges, handle corners without bulk, and seamlessly join the ends using expert weaving and stitching techniques. With the right tools and attention to detail, even beginners can achieve results that rival store-bought designer pillows.
Measure and Cut Cording Accurately
Before sewing, calculate exactly how much cording you need to wrap the entire pillow edge without coming up short.
Calculate Perimeter Plus Extra
Use this formula to determine your cording needs. Take the side length, multiply by four, then add five to six inches for overlap and joining. For a standard fourteen-inch pillow, that equals sixty-two inches of cording required. Always cut longer than needed. Never cut exact. The extra length ensures you have enough for overlapping and joining the ends invisibly.
Prevent Fraying Before Cutting
Braided cording, especially silk, rayon, or loosely spun fibers, unravels easily during prep. Tape all strand ends with small pieces of masking or clear tape before cutting or unraveling. This keeps the braid intact during prep and gives you full control when weaving. If tape is not available, apply a dab of fray-check or clear nail polish just beyond the cut point, using sparingly to avoid stiffness.
Attach Cording to Pillow Front

Securing the cording to the front fabric is the foundation of a clean, professional look.
Set Up Your Machine for Cording
Attach a zipper foot or welt cording foot so you can stitch close to the cord. Adjust needle position to the left for tighter clearance. Use three to three-and-a-half millimeter stitch length to reduce puckering on textured fabrics. Choose the right needle based on your fabric weight. A ninety slash fourteen needle works for medium fabrics, while a one hundred slash sixteen needle handles heavy upholstery fabrics. Thread should match or complement the cording, and polyester or upholstery thread adds strength for high-use pillows.
Position Cording Correctly
Place front fabric right side up. Lay cording along the edge with braided strands facing outward and fabric tape or lip side down, aligned with the raw edge. Start at bottom center to hide the join best. Leave a three to five-inch tail at the beginning for joining later.
Sew Cording in Place
Begin stitching one inch from the end, leaving a tail free. Backstitch to secure. Sew slowly, guiding the cording under the foot. Keep the needle as close to the cord as possible. Maintain even tension and do not stretch the cording as you sew.
Handle Corners Smoothly
Stop sewing one-quarter to one-half inch before each corner. Clip the seam allowance of the fabric tape to allow a sharp turn. Ease the cording around the corner without pulling or twisting. Resume sewing on the next side. For mitered corners, taper the seam allowance slightly to reduce bulk once turned.
Join Ends Seamlessly
The join is the most visible and technically challenging part. A poorly done seam ruins the clean look, so do it right.
Overlap and Weave Strands
This method works best for braided flanged cord. When nearing the beginning, stop sewing one to one-and-a-half inches before the original start. Backstitch and lift the presser foot. Trim excess fabric tape from both the starting tail and ending cord. Unravel the last three to five inches of braid from both ends. Tape just beyond the unravel point to keep strands from twisting.
Lay the unraveled starting tail strands flat, side by side, pointing downward. Place the ending cord strands over them. Match color sequence and direction as closely as possible. For variegated cords, shift strands slightly to align dominant colors. Viewers follow the flow of the braid, not individual strand positions, so visual continuity matters more than perfect alignment.
Flatten the overlapped bundle. Machine-stitch across the join with a straight or zig-zag stitch. Ensure stitching catches both the tape and woven strands. Trim excess bulk on the back. Press lightly with a pressing cloth if needed.
Angled Seam Join for Fabric-Covered Cording
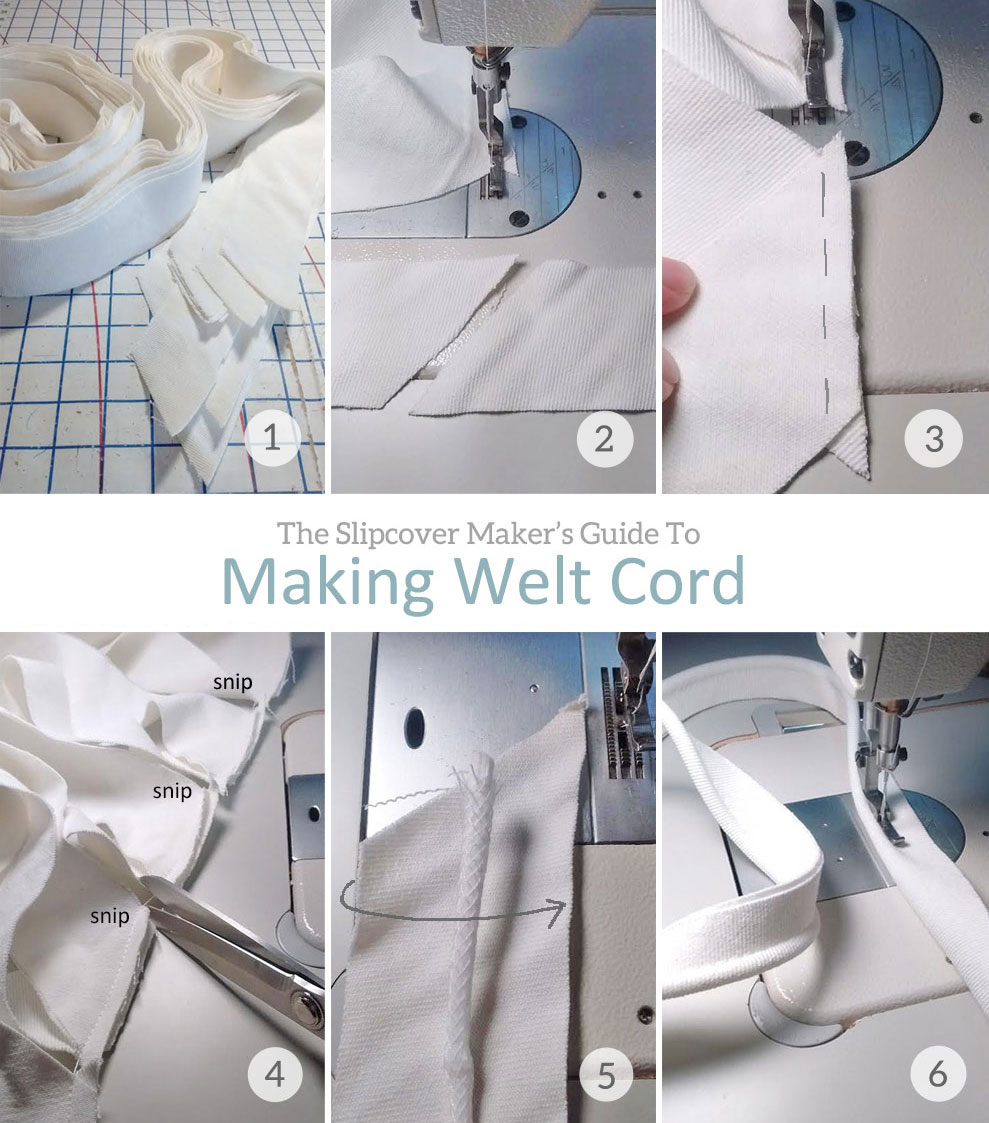
Use this method if you are working with covered welt cord or a braided trim that has a fabric wrap you can open. Unfold the tape on both ends for three to four inches to expose the core and fabric strip.
On the first end, cut a forty-five-degree angle from inner to outer edge. On the second end, cut a one-quarter-inch notch to match the angle. Place top over bottom so angled cuts meet. Sew with one-quarter-inch seam allowance. Press seam open. Re-wrap the fabric around the cord. Trim both ends at forty-five degrees to reduce bulk. Sew over the join again with the cording foot to lock it in place.
Unravel and Weave for Yarn Braided Cording
Ideal for handmade yarn braids used in boho or embroidered pillows. Unravel the last three to four inches of both ends. Weave the yarns together tightly, interlacing like a braid. Pull the woven tails into the seam allowance to flatten. Sew across the base of the tails with the zipper foot. Trim excess flush. Hand-stitch the braid to the seam afterward for extra durability.
Sew Pillow Back in Place
Now that the cording is attached and joined, it is time to close the pillow.
Prepare Back Fabric
Cut back piece identical to front. Optional, round corners slightly for a softer look. Overcast raw edges on a serger if fabric frays easily.
Assemble Layers
Place back fabric right side down over front, ensuring right sides together. Align edges carefully. Check that cording lies flat and is not twisted. Pin or clip every two to three inches, especially at corners and the join. A twisted cord will create a lopsided edge, so double-check alignment before sewing.
Sew Perimeter with Opening
Use the same cording foot. Sew around entire perimeter with one-half-inch seam allowance. Leave a four to six-inch opening on one side, usually bottom, for inserting the pillow form. Backstitch at start and end. Alternatively, sew only three sides and leave bottom open, then hand-stitch after inserting form.
Clip Corners to Reduce Bulk
Trim excess fabric diagonally at each corner. This reduces bulk and helps corners turn out sharply when flipped.
Turn, Insert and Close
The final steps bring your pillow to life.
Turn Right Side Out
Carefully turn cover right side out through the opening. Use a point turner, chopstick, or similar tool to push out corners fully. Ensure cording lies flat and evenly around all edges.
Insert Pillow Form
Gently insert form. Push corners into fabric corners. Adjust for crisp, even shape. Avoid bunching or twisting. Slightly overstuffed forms give a plump, luxurious look, but do not force it.
Close Opening with Ladder Stitch
Fold raw edges inward, using one-half-inch hem for machine-sewn backs or one-quarter-inch fold for hand closure. Pin or clip in place. Hand-stitch closed using ladder invisible stitch. Sew from center outward for even tension. Hide thread ends by pulling into seam allowance. Avoid machine-stitching the opening unless a visible seam is acceptable, as it looks less professional.
Enhance Durability and Finish
Take your pillow from good to gallery-worthy with these pro upgrades.
Reinforce High-Stress Areas
Backstitch multiple times at the join and starting point. Zig-zag over loose threads before assembling. Hand-stitch braid to seam from the inside, especially for yarn cords.
Flatten Bulky Joins
If the join creates a lump, lightly hammer the area after stitching using a wood block. Or press with a pressing cloth and low heat, avoiding direct iron contact with synthetics.
Double-Stitch for Polished Look
After turning, sew around the entire pillow again from the back side. This adds a second row of stitching closer to the cord and hides minor imperfections while adding durability.
Design Tips and Placement
Make your cording work with your overall aesthetic.
Hide the Join at Bottom Center
Start and end cording at bottom center edge. This keeps the join hidden when pillow is displayed. Avoid starting at corners, as it increases visibility and stress.
Match or Contrast Thread
Use matching thread for a seamless look. Use contrast thread for intentional decorative effect.
Choose Braid Thickness Wisely
Thicker braids make bold statements, ideal for large-scale crewel or modern decor. Thinner cords suit delicate fabrics and minimalist styles.
Troubleshoot Common Issues
Even pros run into problems. Here is how to fix them fast.
Cord unravels during prep. Solution: Tape strand ends before cutting.
Visible lump at join. Solution: Trim excess on back, flatten with hammer or presser.
Join pulls apart. Solution: Ensure three-inch overlap, stitch multiple times.
Cord twists or buckles. Solution: Maintain natural forty-five-degree angle, baste in place first.
Stitching skips thread. Solution: Use ninety slash fourteen or one hundred slash sixteen needle, reduce speed.
Cording rolls under. Solution: Push firmly against cording foot, check alignment.
Fabric puckers. Solution: Lengthen stitch, avoid stretching.
Bulky corners. Solution: Clip seam allowances, ease cording.
Cording detaches after washing. Solution: Reinforce start and end with backstitching, secure tails inside seam.
Final Checklist
Review these steps before finishing your pillow.
Measure perimeter and add five to six inches to cording length. Tape all strand ends before cutting. Attach cording foot and set machine to three to three-and-a-half millimeter stitch. Start stitching one inch from end, leaving three to five-inch tail. Sew cording to front, clipping tape at corners. Stop one inch before start, unravel last three to five inches. Overlap and weave strands, matching colors. Machine-stitch join, trim bulk. Place back fabric right sides together, pin thoroughly. Sew perimeter, leave four to six-inch opening. Clip corners diagonally. Turn right side out, push out corners. Insert pillow form, adjust shape. Fold opening edges, ladder-stitch closed.
Frequently Asked Questions About Sewing Braided Cording on a Pillow
What type of cording foot do I need for sewing braided cording?
You need either a zipper foot or a welt cording foot. Both allow you to stitch close to the cord without the foot riding over the braid. Adjust the needle position to the left for tighter clearance.
How much extra cording should I add to my pillow measurements?
Add five to six inches beyond the calculated perimeter. For a fourteen-inch pillow, that means cutting approximately sixty-two inches. The extra length ensures you have enough material for overlapping and joining the ends invisibly.
How do I prevent my braided cording from unraveling during preparation?
Tape all strand ends before cutting or unraveling. Apply small pieces of masking tape or clear tape to each end of every strand. This is especially critical for silk, acetate, rayon, or loosely spun fibers.
What is the best way to join braided cording ends together?
The overlap and weave method works best for braided flanged cord. Unravel three to five inches of both ends, align the strands by color and direction, then machine-stitch across the overlapped section. This creates a nearly invisible join with no bulk.
How do I hide the cording join on my pillow?
Start and end your cording at the bottom center edge of the pillow. This location keeps the join hidden when the pillow is displayed, as it falls in the least visible area.
Key Takeaways for Sewing Braided Cording on Pillows
Sewing braided cording on a pillow transforms a simple DIY project into a custom home accent. The most critical technique is the seamless join, which requires unraveling both ends, aligning the strands by color and direction, and machine-stitching the overlap securely. Always start and end your cording at bottom center to hide the join, and use a zipper or cording foot to stitch close to the cord for professional results. Practice on scrap fabric first, especially with new cord types or fabrics, and soon you will be making statement pillows that look like they came from a design showroom.