
Tired of worn-out throw pillows but do not know how to sew? You are not alone, and you do not need to be. Recovering a pillow without sewing is a smart, budget-friendly way to refresh your living room, bedroom, or patio without buying new decor. Whether you are a renter avoiding permanent changes, a parent crafting with kids, or just looking for a quick DIY upgrade, no-sew pillow recovery offers instant results with zero stitching. Using simple techniques like fabric glue, iron-on tape, knotting, or elegant wrapping, you can transform old or plain pillow forms into stylish accent pieces in under 30 minutes. This guide breaks down the most effective, durable, and beginner-friendly methods, each tested and proven to deliver professional-looking results.
From washable envelope-style covers to decorative Japanese wraps, we will walk you through every step, tool, and tip so you can choose the best method for your needs. No machines. No sewing skills. Just bold new pillows.
Choose the Right No-Sew Method for Your Needs
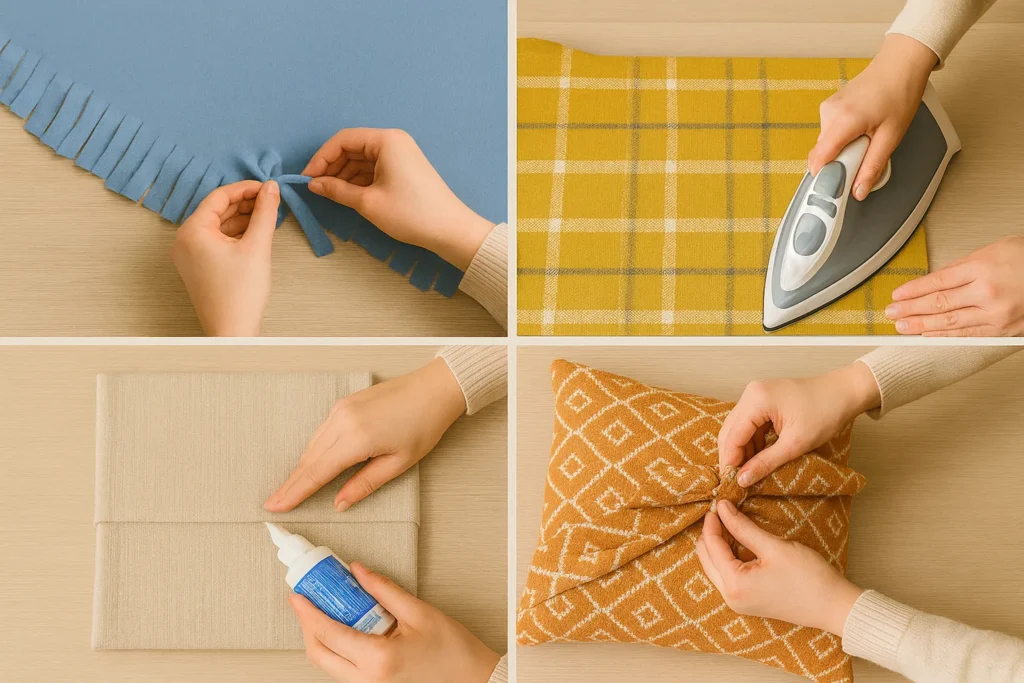
Not all no-sew pillow recoveries are the same. Your choice depends on durability, washability, and how often you will use the pillow. Here is a quick comparison to help you decide.
| Method | Best For | Washable | Time Required |
|---|---|---|---|
| Fabric Glue (Envelope) | Daily use, reusable covers | Yes | 30 to 45 minutes plus drying |
| Heat n Bond Tape | Durable, sewn-like finish | Yes | 20 to 30 minutes |
| Fringe-Tying | Kids rooms, rustic style | No | 20 to 25 minutes |
| Japanese Wrapping | Decorative, temporary swaps | No | Under 5 minutes |
| Gift-Wrap Style | Instant styling, photo shoots | No | Under 3 minutes |
Pick fabric glue or Heat n Bond for long-term, washable covers. Choose wrapping or fringe for fun, temporary, or kid-friendly projects.
Create a Washable Cover with Fabric Glue
The envelope-style fabric glue method is the most durable and practical way to recover a pillow without sewing. It creates a removable, machine-washable cover with a clean, overlapping back, just like store-bought pillows.
Cut Fabric to the Right Size
Start by measuring your pillow insert. Use this guide to cut your fabric.
| Insert Size | Front Panel | Each Back Panel |
|---|---|---|
| 16 inches | 16 by 16 inches | 11 by 16 inches |
| 18 inches | 18 by 18 inches | 13 by 18 inches |
| 20 inches | 20 by 20 inches | 15 by 20 inches |
| 22 inches | 22 by 22 inches | 16 by 22 inches |
Pro Tip: Cut the front panel 1 inch smaller than your insert (for example, 19 inches for a 20-inch pillow) for a tighter, plump look.
Hem the Back Panels
Fold one long edge of each back panel twice, half an inch each fold, to hide the raw edge. Iron flat, then apply a thin line of permanent fabric glue (like Liquid Stitch or Fabric Fusion) along the inner fold. Clamp with binder clips and let dry for 4 to 6 hours.
Assemble the Pillow Cover
Lay the front panel face-up. Place one back panel face-down, aligning its glued edge with the top of the front. Place the second back panel face-down, aligning its edge with the bottom. The two back panels should overlap in the center with no gap.
Apply a thin bead of glue half an inch from the edge on all three open sides. Lift the fabric slightly to inject glue between layers for a stronger bond. Clamp with clips and let cure overnight for maximum strength.
Insert Pillow and Finish
Once dry, turn the cover right-side out. Use a chopstick to push out corners. Insert your pillow and fluff by hand or give it a karate chop for a hotel-style finish.
Washable: Hand wash or gentle machine cycle. Air dry to preserve glue bonds.
Apply Heat n Bond for Sewn-Like Seams
If you want a no-sew cover that looks stitched, Heat n Bond UltraHold tape is your best bet. This iron-activated adhesive creates strong, flexible seams, perfect for daily-use pillows.
Trace and Cut Fabric
Place your pillow on the right side of the fabric. Trace around it, adding 1 inch of seam allowance on all sides. Cut two identical pieces using this template.
Bond Three Sides
Lay both fabric pieces with right sides together. Apply Heat n Bond tape 1 inch from the edge along three sides. Use a dry iron (no steam) and press each section for 10 to 15 seconds. Let cool for 5 minutes before handling.
Leave a 5-inch opening on the fourth side for inserting the pillow.
Insert and Seal
Turn the cover right-side out. Insert the pillow. Apply Heat n Bond tape to the inner edges of the opening and press with the iron to seal.
Machine Washable: Delicate cycle, warm water. No fabric softener. Do not dry clean.
Warning: Avoid high-heat fabrics like some synthetics. Heat tape can melt or warp them.
Tie Fringe for a Rustic Look
The fringe-tying method is perfect for kids rooms, playrooms, or bohemian decor. It is fun, tactile, and requires only fabric and scissors.
Cut Fabric and Create Fringe
Cut two fabric pieces to 22 by 16 inches for a 10 by 16-inch finished pillow. Add 6 inches to each dimension to allow for knotting.
Cut a 3 by 3-inch square from each corner of both pieces to reduce bulk. Cut quarter-inch wide, 3-inch long fringe strips around all edges.
Tie the Fringe
Align the two fabric pieces with right sides facing out. Tie adjacent fringe strips together with a single knot, working around all sides. Leave a 3-inch gap on one side to insert the pillow.
Fill and Close
Insert the pillow or filling. Once firm, tie the remaining fringe. Double-knot the corners for extra strength.
Design Tip: Use flannel for softness or mix patterns for playful contrast.
Not washable. Spot clean only. Knots may loosen with heavy use.
Wrap Like Japanese Furoshiki
The Japanese fabric wrapping technique is the fastest way to refresh a pillow. No cutting, no tools, no glue. Inspired by furoshiki cloth wrapping, it is ideal for temporary decor.
Center Pillow on Fabric
Use a square fabric (at least 24 by 24 inches). Lay it flat in a diamond shape. Place the pillow in the center.
Cross and Tuck Corners
Bring one pair of opposite corners over the top. Fold the fabric in half so the center aligns with the pillow midpoint. Tuck the loose ends underneath to create clean edges.
Tie a Decorative Knot
Gather the two ends at the top and tie a secure double knot. For a polished look, tuck the ends under the pillow or secure with fabric tape.
Fully reversible. Unwrap and rewrap with a new fabric in seconds.
Great for: Holiday decor, photo shoots, or testing fabric combos before committing.
Not durable. Best for decorative use only.
Try Gift-Wrap Style for Fast Swaps
Need a 5-minute pillow refresh? Use the gift-wrap method, just like wrapping a present.
Wrap and Secure
Place the pillow in the center of a large fabric square. Bring opposite sides over the top and tuck under. Fold in the ends like a gift. Secure with washi tape, ribbon, or decorative pins.
Takes less than 3 minutes. Swap fabrics weekly, perfect for renters or seasonal styling.
Not washable. Knots or tape may loosen over time.
Pick the Best Fabric for Your Project
Your fabric choice affects durability, texture, and ease of use. Here are the top no-sew fabric picks.
• Cotton-linen blends: Breathable, easy to glue, great for everyday pillows
• Upholstery fabric: Durable, fade-resistant, ideal for living rooms
• Flannel: Soft and cozy, perfect for kids fringe pillows
• Burlap: Rustic texture, pair with cotton for contrast
• Outdoor fabric: UV-resistant, use with waterproof glue for patio pillows
• Vintage scarves: Reuse for wrapping, adds elegance and character
Always pre-wash fabric to prevent shrinkage after assembly.
Paint plain fabric with Martha Stewart Satin Paints for custom designs. No medium needed.
Avoid Common Mistakes
Even simple projects can go wrong. Here is how to fix the most frequent issues.
Fix Glue Bleed-Through
Using too much glue causes stains. Solution: Apply glue with a toothpick or small brush for precision. Wipe excess immediately.
Prevent Weak Bonds
A weak bond means poor drying. Solution: Let glue cure 6 to 8 hours (or overnight). Use high-quality fabric glue like Unique Stitch.
Stop Uneven Edges
Crooked cuts lead to lopsided pillows. Solution: Iron fabric first. Use a ruler and fabric chalk to mark cuts.
Avoid Tight or Loose Pillows
Front panel too big? Pillow sags. Too small? Hard to insert. Solution: Cut front panel the same size or 1 inch smaller than insert.
Close Back Panel Gaps
Back panels too narrow? Gap in the center. Solution: Each back panel should be 5 to 6 inches narrower than the front.
Maintain Your No-Sew Pillows
Longevity depends on care. Follow these tips to keep your covers fresh.
Wash Gently
Fabric glue covers: Hand wash or delicate machine cycle. Air dry.
Heat n Bond covers: Machine wash warm, delicate cycle. No dryer.
Fringe or wrapped pillows: Spot clean only.
Never use fabric softener. It weakens adhesive bonds.
Store Properly
Keep unused covers in breathable cotton bags to prevent yellowing or moisture buildup.
Refresh When Needed
Envelope-style covers let you swap inserts or re-cover when fabric wears. Keep extra glue and fabric on hand.
Boost Results with Pro Tips
Take your no-sew pillow game to the next level.
• Pre-wash and iron fabric to eliminate shrinkage and ensure clean cuts
• Use sharp scissors. Dull blades fray edges. Titanium-coated fabric shears cut cleanly every time
• Control glue flow with a toothpick or paintbrush for thin, even lines
• Apply even pressure after gluing with a roller or flat object
• Let it cure fully. Overnight curing equals maximum strength and wash resistance
• Upcycle smart. Grab pillow inserts from TJ Maxx, HomeGoods, or thrift stores for $3 to $5
Explore Creative Uses
No-sew pillow recovery is not just for couches.
Make Outdoor Pillows
Use outdoor fabric plus waterproof glue. Perfect for patios or porches.
Create Seasonal Swaps
Make holiday-themed covers for Christmas, fall, or summer. Store off-season ones flat.
Craft with Kids
Let children paint, tie, or wrap their own pillows. Safe, fun, and personalized.
Gift Custom Pillows
Wrap in tissue and tie with ribbon. Ideal for housewarmings or birthdays.
Upcycle Old Textiles
Turn old curtains, shirts, or tablecloths into unique covers. Eco-friendly and stylish.
Batch Make for Efficiency
Cut and glue multiple covers at once. Save time and materials.
Frequently Asked Questions About Recovering Pillows Without Sewing
Can I use regular glue for fabric pillow covers?
No. Regular school glue or craft glue will not hold fabric bonds through washing. Use permanent fabric glue specifically designed for textiles, such as Fabric Fusion, Liquid Stitch, or Unique Stitch. These adhesives create flexible, wash-resistant bonds that withstand regular use.
How long does fabric glue take to dry on pillow covers?
A basic bond sets in 30 minutes, but full cure takes 4 to 6 hours. For maximum strength and wash resistance, let glue cure overnight before inserting the pillow. Rushing this step results in weak seams that separate after washing.
Can I wash no-sew pillow covers in the washing machine?
Yes, but it depends on the method. Fabric glue and Heat n Bond covers are machine washable on delicate cycles with warm water. Air dry only. Fringe-tied, wrapped, and gift-wrap style covers are not machine washable. Spot clean these instead.
What is the most durable no-sew pillow method?
The fabric glue envelope-style method is the most durable. When properly cured overnight, it creates bonds comparable to stitching and lasts 1 to 3 years with moderate use. Heat n Bond also offers high durability with a sewn-like finish.
Can I use this method on outdoor pillows?
Yes. Use outdoor or patio fabric rated for UV resistance, combined with a waterproof fabric glue (not Heat n Bond, which requires ironing and can melt synthetic outdoor fabrics). This combination withstands weather exposure on porches and patios.
Can children help with no-sew pillow projects?
Yes, with supervision. The fringe-tying method and Japanese wrapping technique are particularly child-friendly. Use blunt scissors, non-toxic glue, and avoid methods requiring ironing or sharp tools. These projects are safe for ages 6 and up with adult guidance.
Key Takeaways for Recovering Pillows Without Sewing
Recovering a pillow without sewing is more than a craft. It is a smart design strategy that delivers beautiful, functional results without a needle or sewing machine. Whether you use fabric glue for durability, Heat n Bond for polish, or wrapping for speed, you can achieve professional-looking pillow covers that transform your space instantly.
The fabric glue envelope method stands out as the best choice for daily-use pillows. It creates washable, removable covers that last years and allow easy fabric swaps when you want a change. Heat n Bond offers a close second with its sewn-like appearance and comparable durability.
These methods are beginner-proof, cost-effective (under $10 per cover), and perfect for renters, parents, and eco-conscious decorators. With the right fabric, a little patience, and this guide, you will never need to buy another throw pillow again. Gather your materials, choose your method, and start recovering. Your refreshed decor is just a few simple steps away.